Index
a) Deploy Multi-Agent Systems with Agent Development Kit (ADK) and Agent Engine
a) Deploy and Agent with Agent Development Kit (ADK)
Index: Deploy Multi-Agent Systems with Agent Development Kit (ADK) and Agent Engine
Chapter 1: Course Introduction
- Provide agents with session memory and artifact storage.
- Run agents locally and deploy them to Vertex AI Agent Engine to run as a managed agentic flow with infrastructure decision sand resource scaling handled by Agent Engine.
- With Google Cloud, developers can build agents at their preferred level of abstraction.
- There are a range of methods for agent building that range from highly customizable and flexible, which require more effort for configuration and implementation, to very easy to use out-of-the-box solutions that offer very little customization and fine-tuning possibilities.
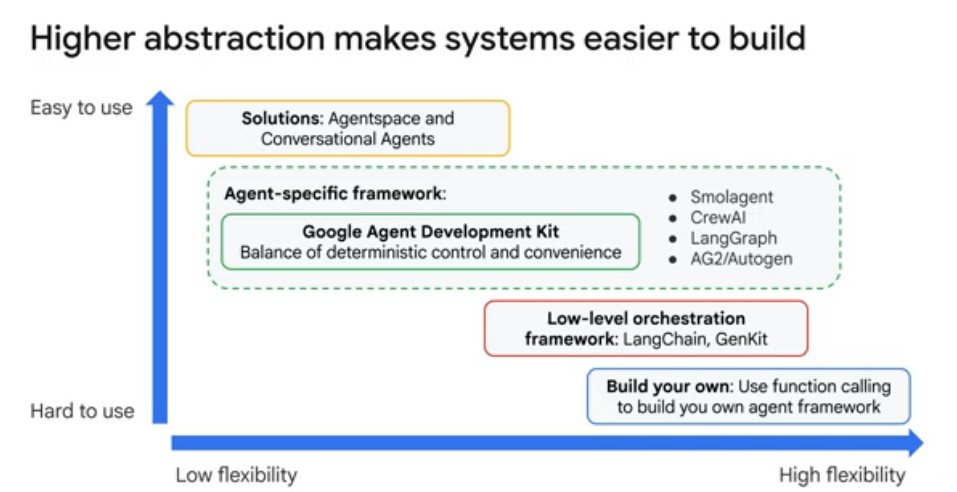
a) Through the Customer Engagement Suite (with Conversational Agents): external-facing conversational agents that can integrate with human support teams and existing telephony and communication platforms.
b) Using Agentspace: internal search to accelerate knowledge exchange throughout your organization, across your drives, chat, mail, ticketing platforms, databases, and more, including AI assistant support.
c) Building agents using open source frameworks or from scratch with Agent Engine: use basic building blocks and start building from the ground up, for example with the Google Gen AI SDK or LangChain, where you will also need to make decisions about infrastructure and hosting.
d) Using the Agent Development Kit with Agent Engine: custom development with support for communication between agents through conversation history and shared state.
- Google ADK:
a) local development user interface, with tools to help debug your agents and multi-agent systems.
b) callbacks that can be used to invoke functions during various stages of a flow.
c) session memory for stateful conversations, which enables agents to recall information about a user across multiple sessions, providing long-term context (in addition to short-term session State).
d) integrates artifact storage to facilitate agent collaboration on documents.
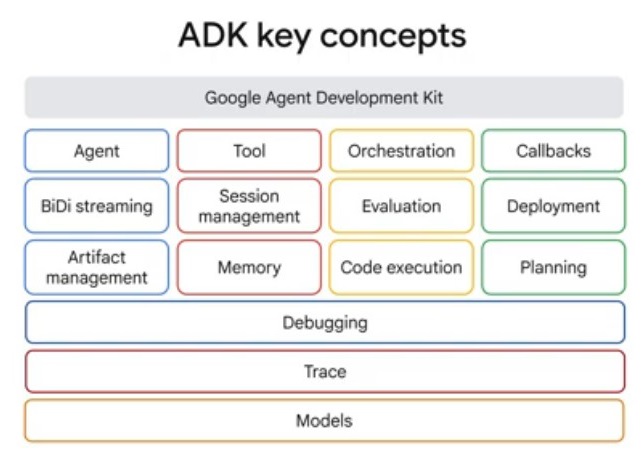
Core Framework Components:
- Agent: The central entity that perceives, reasons, and acts to achieve specific user goals.
- BiDi streaming: Enables bidirectional, real-time data flow, allowing the agent and user to communicate continuously without waiting for full turn completion (Gemini Live API, needs to be enabled with configuration).
- Artifact management: Tracks and versions the various files (images, documents, other binary data), datasets, and outputs created or used by the agent throughout its lifecycle.
- Tool: Specific functions or APIs that the agent can call to perform actions outside its native knowledge, such as querying databases or interacting with external services and APIs.
- Session management: Maintains the state, history, and context of a conversation to ensure continuity across multiple interactions. Session Management for session and state handles the context of a single conversation (the Session), including its history (as Events) and the agent's working memory for that conversation (the State). An Event is the basic unit of communication representing things that happen during a session (such as user message, agent reply, and tool use), forming the conversation history.
- Memory: Stores information, user preferences, and past experiences that the agent retrieves to personalize and improve future performance.
- Orchestration: Manages the complex flow of logic, task sequencing, and decision-making required to coordinate various agent components. As part of this orchestration Google ADK uses a Runner, which is the engine that manages the execution flow, orchestrates agent interactions based on Events, and coordinates with backend services.
- Evaluation: Provides metrics and testing frameworks to assess the agent's accuracy, reliability, and overall performance.
- Code execution: Allows the agent to run code snippets in a sandbox environment to perform calculations, analyze data, or generate dynamic results.
- Callbacks: Defined hooks that execute specific logic in response to system events or state changes during the agent's operation.
- Deployment: The process of packaging and exposing the finished agent to a production environment for user interaction. Google ADK deploys to Agent Engine, a fully managed Google Cloud service enabling developers to deploy, manage, and scale AI agents in production. Agent Engine handles the infrastructure to scale agents in production.
- Planning: The agent's ability to decompose complex tasks into smaller, logical steps and sequence them to achieve a final goal.
Foundation & Support Layers:
- Debugging: Integrated tools and logs used to inspect the agent's internal state to identify and resolve logic or execution errors.
- Trace: Records a granular, step-by-step history of the agent's execution path, making it easier to audit and troubleshoot complex processes.
- Models: The underlying large language models (LLMs) that provide the reasoning, natural language understanding, and generation capabilities for the agent.
- Below is the architecture of the Agent Runtime, which is the operational heart of the Agent Development Kit (ADK) that powers how an AI agent interacts with an end user. Essentially, when a user sends a query, the Orchestration layer uses its Memory and instructions to plan the task. It then calls upon the Generative AI Models to reason through that plan and uses Tools to fetch necessary external information, all within the Agent Runtime to provide a coherent response back to the user.

For more information about ADK, check out these resources:
- ADK documentation Agent Development Kit
-
adk-docsGitHub repository adk-docs - How to secure your AI Agents: A Technical Deep-dive
- Build a multimodal, multi-agent with ADK in 37 lines of code
- In this lab environment, the Agent Platform API and Telemetry API have been enabled for you. In your own projects, you will want to enable them in order to query models and send telemetry data to Cloud Logging.
- Lab Instructions copied over from lesson:
Overview
Building complex agentic applications often requires coordinating multiple specialized models, managing tool integrations, and debugging execution traces—all of which can be manually intensive and difficult to scale.
Agent Development Kit (ADK) solves these challenges by providing a modular framework to build, test, and deploy multi-agent systems. It allows you to compose specialized agents into a hierarchy, equip them with pre-built or custom tools, and orchestrate workflows using both predictable pipelines and dynamic LLM-driven routing.
In this lab, you use ADK to build a research assistant that leverages model_name to analyze data and generate structured reports. You explore how to
manage these dependencies dynamically to ensure your agentic workflows remain robust as new models are released.
Objectives
In this lab, you learn how to perform the following tasks:
- Describe ADK architecture (agents, tools, and sessions).
- Configure a local development environment for agentic apps.
- Define agents with dynamic models and custom tool access.
- Execute and inspect agents using the ADK browser UI, Python code, and the CLI chat interface.
Benefits of ADK
ADK offers several key advantages for developers building agentic applications:
- Multi-agent systems: Build modular, scalable applications by composing specialized agents into hierarchical structures.
- Rich tool ecosystem: Equip agents with pre-built tools, custom functions, or integrations from frameworks like LangChain and CrewAI.
- Flexible Orchestration: Define predictable pipelines with workflow agents or use LLMs for adaptive, dynamic routing.
- Integrated Developer Experience: Develop and debug locally with a powerful CLI and an interactive UI to inspect execution step-by-step.
- Built-in Evaluation: Systematically assess performance by evaluating response quality and execution trajectories against test cases.
- Deployment Ready: Easily containerize and scale agents on Agent Runtime, Cloud Run, or custom Docker infrastructure.
While other SDKs allow you to query models, ADK provides a higher-level framework that handles the complex coordination between multiple models for you.
Setup and requirements
Task 1. Install ADK and set up your environment
In this task, you configure the Cloud Shell Editor, initialize your project, and install the Agent Development Kit (ADK) to prepare your environment for building and testing agentic applications.
Enable recommended APIs
In this lab environment, the Agent Platform API and Telemetry API have been enabled for you. In your own projects, you will want to enable them in order to query models and send telemetry data to Cloud Logging.
Prepare a Cloud Shell Editor tab
-
Click Activate Cloud Shell ( ) in the Google Cloud console title bar.
-
Click Continue.
-
When prompted to authorize Cloud Shell, click Authorize.
-
In the Cloud Shell Terminal action bar, click Open in new window .
-
Click Open Editor ( ) on the Cloud Shell Editor action bar, to view files.
-
Click Explorer ( ) in the left pane to open your file explorer.
-
Click Open Folder.
-
In the Open Folder dialog that opens, click OK to select your Google Skills student account's home folder.
-
Close any additional tutorial or Gemini panels that appear on the right side of the screen to save more of your window for your code editor.
For the rest of this lab, you work in this window as your IDE with the Cloud Shell Editor and Cloud Shell Terminal.
Download and install ADK and code samples for this lab
-
Paste the following command into the Cloud Shell Terminal to copy a project directory with code for this lab from a Cloud Storage bucket:
gcloud storage cp -r gs://YOUR_GCP_PROJECT_ID-bucket/* . -
Update your
PATHenvironment variable to include your user's local environment and install ADK, including the OpenTelemetry (OTel) plugin for logging & telemetry, and other lab requirements by running the following commands in the Cloud Shell Terminal:export PATH=$PATH:"/home/${USER}/.local/bin"
python3 -m pip install google-adk[otel-gcp]==1.30.0 -r adk_project/requirements.txt
Task 2. Review the core concepts and structure of ADK project directories
Explore the core concepts and fundamental building blocks of ADK, including agents, tools, and orchestration patterns, to understand the principles used to design effective and flexible multi-agent systems:
- Agent: Agents are core building blocks designed to accomplish specific tasks. They can be powered by LLMs to reason, plan, and utilize tools to achieve goals, and can even collaborate on complex projects.
- Tools: Tools give agents abilities beyond conversation, letting them interact with external APIs, search information, run code, or call other services.
-
Session Services: Session services handle the context of a single conversation (
Session), including its history (Events) and the agent's working memory for that conversation (State). - Callbacks: Custom code snippets you provide to run at specific points in the agent's process, allowing for checks, logging, or behavior modifications.
- Artifact Management: Artifacts allow agents to save, load, and manage files or binary data (like images or PDFs) associated with a session or user.
- Runner: The engine that manages the execution flow, orchestrates agent interactions based on Events, and coordinates with backend services.
Next, explore the standard layout of an ADK project to see how these concepts are organized in practice:
-
In the Cloud Shell Editor's file explorer pane, click adk_project to open the directory.
-
Notice the four agent directories in adk_project:
adk_utils,app_agent,llm_auditor, andmy_google_search_agent. Each of these directories represents a separate agent. Separating agents into their own directories within a project directory provides organization and allows ADK to understand what agents are present. -
Click my_google_search_agent to explore an agent directory.
Note: Make sure you are in theadk_project/my_google_search_agentdirectory at this point. -
Click init.py to view its contents and notice that the directory also contains an
agent.pyfile. -
Notice that the
init.pyfile contains a single line, which imports from theagent.pyfile. ADK uses this to identify this directory as an agent package:from . import agent -
Click agent.py to view the code for a simple agent equipped with the Google Search tool.
- The imports from
google.adk: theAgentclass and thegoogle_searchtool from thetoolsmodule. - Read the code comments that describe the parameters that configure this simple agent.
- The imports from
-
To use the imported
google_searchtool, it needs to be passed to the agent. Paste the following line into theagent.pyfile around line 34, where indicated at the end of theAgentobject creation:tools=[google_search] -
Save the
agent.pyfile.
Tools enable an agent to perform actions beyond generating text. In this case, the google_search tool allows the agent to decide when it would like more
information than it already has from its training data. It can then write a search query, use Google Search to search the web, and then base its response to the user
on the results.
When a model bases its response on additional information that it retrieves, it is called "grounding," and this overall process is known as "retrieval-augmented generation" or "RAG."
Task 3. Run the agent using the ADK Dev UI
ADK includes a development UI designed to run locally to help you develop and test your agents. It can help you visualize what each agent is doing and how multiple agents interact with one another. In this task, you explore this interface.
Note: When you run an agent, ADK needs to know who is requesting the model API calls. You can provide this information in one of two ways:
- Provide a Gemini API key.
- Authenticate your environment with Google Cloud credentials and associate your model API calls with an Agent Platform project and location.
In this lab, you take the Agent Platform approach.
-
In the Cloud Shell Terminal, run the following commands to write an
.envfile to set your environment variables instructing the agent to use your project and the global endpoint:cd ~/adk_project
cat << EOF > my_google_search_agent/.env
GOOGLE_GENAI_USE_VERTEXAI=TRUE
GOOGLE_CLOUD_PROJECT=YOUR_GCP_PROJECT_ID
GOOGLE_CLOUD_LOCATION=global
MODEL=gemini_flash_model_id
OTEL_SERVICE_NAME=adk-agent
OTEL_PYTHON_LOGGING_AUTO_INSTRUMENTATION_ENABLED=true
OTEL_INSTRUMENTATION_GENAI_CAPTURE_MESSAGE_CONTENT=true
EOF
These variables serve the following roles:
-
GOOGLE_GENAI_USE_VERTEXAI=TRUEindicates that you use Vertex AI for authentication as opposed to Gemini API key authentication. -
GOOGLE_CLOUD_PROJECTandGOOGLE_CLOUD_LOCATIONprovide the project and location with which to associate your model calls. -
MODELis not required, but is stored here so that it can be loaded as another environment variable. This can be a convenient way to try different models in different deployment environments. -
OTEL_SERVICE_NAME,OTEL_PYTHON_LOGGING_AUTO_INSTRUMENTATION_ENABLED, andOTEL_INSTRUMENTATION_GENAI_CAPTURE_MESSAGE_CONTENTare used to configure OpenTelemetry (OTel) for collecting ADK-specific telemetry data from the agent.
The ADK Dev UI and CLI chat interface automatically load configurations from an
.envfile. If no file is present, they use system environment variables with matching names. -
-
In the Cloud Shell Terminal, ensure you are in the adk_project directory where your agent subdirectories are located by running:
cd ~/adk_project -
Launch the ADK Dev UI with the following command with some useful flags:
adk web --allow_origins "regex:https://.*\.cloudshell\.dev" --otel_to_cloud --reload_agents
This command will:- Launch a Fast API web server with the ADK Dev UI
- Allow the Cloud Shell web preview to query your agent
- Send telemetry data to Cloud Logging
- Reload agents when code changes are detected
The result is the ADK Dev UI URL is displayed, as the DEV UI is currently running.
-
To view the web interface in a new tab, click the http://127.0.0.1:8000 link in the Terminal output, which links you via proxy to this app running locally on your Cloud Shell instance. The result is you see the Dev UI running in a new tab.
-
From the Select an agent menu options on the left, select my_google_search_agent.
-
To prompt the agent to use its Google Search tool, enter the question: I know the Summer olympics are happening in 2028, please tell me which countries are participating and what events will be held.
Notice the agent uses Google Search to retrieve real-time information, bypassing the knowledge cutoff of its pre-trained model.
Note: A response using grounding with Google search includes ready-to-display HTML "Search Suggestions" like those you see at the bottom of the agent's response. When you use grounding with Google Search, you are required to display these suggestions, which help users follow up on the information the model used for its response. -
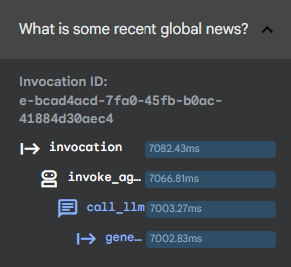
Notice that in the left pane, you are in the Trace tab by default. Click on your last query text (I know the Summer olympics...) to see a trace of how long different parts of your query took to execute.
You can use this to debug more complex executions involving tool calls to understand how various processes contribute to the latency of your responses.
Show Image
-
Return to the chat discussion section of the window, and click the agent icon ( ) next to the agent's response in the right pane to inspect the event returned by the agent. This event includes the
contentreturned to the user andgroundingMetadatadetailing the search results that the response was based on. -
When you are finished exploring the ADK Dev UI, close this browser tab.
-
Return to your browser tab with the Cloud Shell Terminal and click in the terminal's pane.
-
Press CTRL+C to stop the web server.
Task 4. Run an agent programmatically
While the ADK Dev UI is great for testing and debugging, it is not suitable for presenting your agent to multiple users in production.
To run an agent as part of a larger application, you need to include a few additional components in your agent.py script that the web app handled for
you in the previous task. Proceed with the following steps to open a script with these components to review them.
-
You can set environment variables for all of your agents to use if they do not have .env files in their directories. In the Cloud Shell Terminal run the following commands to export environment variables:
export GOOGLE_GENAI_USE_VERTEXAI=TRUE export GOOGLE_CLOUD_PROJECT=YOUR_GCP_PROJECT_ID export GOOGLE_CLOUD_LOCATION=global export MODEL=gemini_flash_model_id -
In the Cloud Shell Editor file browser, click adk_project/app_agent.
-
Click the agent.py file in this directory.
-
This agent is designed to run as part of an application. Read the commented code in
agent.py, paying particular attention to the following components in the code:-
InMemoryRunner()(around line 68), an oversight of agent execution feature: The Runner is the code responsible for receiving the user's query, passing it to the appropriate agent, receiving the agent's response event and passing it back to the calling application or UI, and then triggering the following event. You can read more in the ADK documentation about the event loop. -
runner.session_service.create_session()(around line 71), a conversation history and shared state feature. Sessions allow an agent to preserve state, remembering a list of items, the current status of a task, or other 'current' information. This class creates a local session service for simplicity, but in production this could be handled by a database. -
types.Content()andtypes.Part()(around lines 78 and 79), a structured, multimodal messages feature. Instead of a simple string, the agent is passed a Content object which can consist of multiple Parts. This allows for complex messages, including text and multimodal content to be passed to the agent in a specific order.
Notice that the script includes a hardcoded query (around line 93), which asks the agent:
"What is the capital of France?" -
-
Run the following command in the Cloud Shell Terminal to run this agent programmatically:
python3 app_agent/agent.pySelected Output:
User says: What is the capital of France?
trivia_agent: The capital of France is Paris.
Add Pydantic schema classes
You can also define specific input and/or output schema for an agent as follows:
-
Around line 28, add the following import statements for the Pydantic schema classes
BaseModelandFieldto define a schema class:from pydantic import BaseModel, Field class CountryCapital(BaseModel): capital: str = Field(description="A country's capital.") -
In your
root_agent'sAgentdefinition, around line 62, set theoutput_schemaparameter to use theCountryCapitalschema you defined above:output_schema=CountryCapital -
Run the agent script again to see the response following the
output_schema:python3 app_agent/agent.py
Output:
User says: What is the capital of France?
trivia_agent: {"capital": "Paris"}
Task 5. Chat with an agent via the command-line interface
You can also chat with an agent in your local development environment by using the command line interface. This can be very handy for quickly debugging and testing agents as you develop them.
Like the web interface, the command line interface also handles the creation of the session service, artifact service, and runner for your agent.
To run an interactive session using the command line interface:
-
Run the following in Cloud Shell Terminal:
adk run my_google_search_agentOutput:
Log setup complete: /tmp/agents_log/agent.20250322_010300.log
To access latest log: tail -F /tmp/agents_log/agent.latest.log
Running agent basic_search_agent, type exit to exit.
user: -
Input the following message:
What are some popular movies that have been released in India this year?Example output (yours may be a little different):
[google_search_agent]: Here are some of the movies that have been released in India in the past month (January 2026 to early February 2026):
* **January 16, 2026**: *Bihu Attack*, *Happy Patel: Khatarnak Jasoos*.
* **January 23, 2026**: *Border 2*.
-
When you are finished chatting with the command line interface, enter exit at the next user prompt to end the chat.
Task 6. Preview a multi-agent example
In this task, you explore a multi-agent system to understand a core ADK capability.
This agentic system evaluates and improves the factual grounding of responses generated by LLMs. It includes:
- a
critic_agentto serve as an automated fact-checker - a
reviser_agentto rewrite responses if needed to correct inaccuracies based on verified findings
To explore this agent:
-
Use the Cloud Shell Editor file explorer to navigate to the directory
adk_project/llm_auditor. -
Within the
llm_auditordirectory, click agent.py. -
Here are a few things to notice about this multi-agent example:
- The
SequentialAgentis a workflow class that passes conversation control between agents sequentially without requiring user input. When executed, thecritic_agentandreviser_agentrespond in order automatically. - These sub-agents are each imported from their own directories within a
sub_agentsdirectory. - Sub-agent directories contain
init.py,agent.pyandprompt.py. Use prompt.py to manage complex prompts independently before importing them into agent.py.
- The
-
Copy the
.envfile you created earlier to be used by this agent as well and launch the ADK Dev UI again by running the following in the Cloud Shell Terminal:cd ~/adk_project cp my_google_search_agent/.env llm_auditor/.env adk web \ --allow_origins "regex:https://.*\.cloudshell\.dev" \ --otel_to_cloud \ --reload_agents -
Click the http://127.0.0.1:8000 link in the Terminal output. A new browser tab opens with the ADK Dev UI.
-
From the Select an agent menu options on the left, select llm_auditor.
-
Start the conversation with the following false statement:
Double check this: Earth is further away from the Sun than Mars.
You should see two responses from the agent in the chat area:
- First, a detailed response from the
critic_agentchecking the truthfulness of the statement based on fact-checking with Google Search. - Second, a short revised statement from the
reviser_agentwith a corrected version of your false input statement, for example, "Earth is closer to the Sun than Mars."
- Next to each response, click the agent icon ( ) to open the event panel for that response (or find the corresponding numbered event on the Events panel and select it).
At the top of the event view, there is a graph that visualizes the relationships between the agents and tools in this multi-agent system. The agent responsible for this response is highlighted.
-
Explore the code further or ask for other fact-checking examples in the Dev UI. Another example you can try is:
Q: Why is the sky blue? A: Because the sky reflects the color of the ocean. -
If you would like to reset the conversation, click New Session on the session title bar to restart the conversation.
-
When you are finished asking questions of this agent, close the browser tab and press CTRL+C in the Terminal to stop the server.
Note: Even though this example uses a SequentialAgent workflow agent, think of this pattern as a human-in-the-loop pattern.
When the SequentialAgent ends its sequence, the conversation goes back to its parent, the llm_auditor in this example, to get a new
input turn from the user and then pass the conversation back around to the other agents.
- This lab covers the use of tools with Agent Development Kit agents. From powerful tools provided by Google, like Google Search and Vertex AI Search, to the rich variety of tools available in the LangChain ecosystem, there are many tools to get started with. Additionally, creating your own tool from a function only requires writing a good docstring!
- After this lab, you will be able to:
a) Provide prebuilt Google or LangChain tools to an agent
b) Discuss the importance of structured docstrings and typing when writing functions for agent tools
c) Write your own tool functions for an agent
Overview
This lab covers the use of tools with Agent Development Kit agents.
From powerful tools provided by Google, like Google Search and Vertex AI Search, to the rich variety of tools available in the LangChain ecosystem, there are many tools to get started with.
Additionally, creating your own tool from a function only requires writing a good docstring!
This lab assumes you are familiar with the basics of ADK covered in the lab Get started with Agent Development Kit (ADK).
Objective
In this lab, you will learn about the ecosystem of tools available to ADK agents. You will also learn how to provide a function to an agent as a custom tool.
After this lab, you will be able to:
- Provide prebuilt Google or LangChain tools to an agent
- Discuss the importance of structured docstrings and typing when writing functions for agent tools
- Write your own tool functions for an agent
Tool use with the Agent Developer Kit
Leveraging tools effectively is what truly distinguishes intelligent agents from basic models. A tool is a block of code, like a function or a method, that executes specific actions such as interacting with databases, making API requests, or invoking other external services.
Tools empower agents to interact with other systems and perform actions beyond their core reasoning and generation capabilities. It's crucial to note that these tools operate independently of the agent's LLM, meaning that tools do not automatically possess their own reasoning abilities.
Agent Development Kit provides developers with a diverse range of tool options:
- Pre-built Tools: Ready-to-use functionalities such as Google Search, Code Execution, and Retrieval-Augmented Generation (RAG) tools.
- Third-Party Tools: Seamless integration of tools from external libraries like LangChain
- Custom Tools: The ability to create custom tools tailored to specific requirements, by using language specific constructs and Agents-as-Tools. The SDK also provides asynchronous capabilities through Long Running Function Tools.
In this lab, you will explore these categories and implement one of each type.
Available Pre-Built Tools from Google
Google provides several useful tools for your agents. They include:
Google Search (google_search): Allows the agent to perform web searches using Google Search. You simply add
google_search
to the agent's tools.
Code Execution (built_in_code_execution): This tool allows the agent to execute code, to perform calculations, data manipulation, or
interact with other systems programmatically. You can use the pre-built VertexCodeInterpreter or any code executor that implements the
BaseCodeExecutor interface.
Retrieval (retrieval): A package of tools designed to fetch information from various sources.
Vertex AI Search Tool (VertexAiSearchTool): This tool integrates with Google Cloud's Vertex AI Search service to allow the agent to
search through your AI Applications data stores.
Task 1. Install ADK and set up your environment
Enable Vertex AI recommended APIs
- In this lab environment, the Vertex AI API has been enabled for you. If you were to follow these steps in your own project, you could enable it by navigating to Vertex AI and following the prompt to enable it.
Prepare a Cloud Shell Editor tab
- With your Google Cloud console window selected, open Cloud Shell by pressing the G key and then the S key on your keyboard. Alternatively, you can click the Activate Cloud Shell button ( ) in the upper right of the Cloud console.
- Click Continue.
- When prompted to authorize Cloud Shell, click Authorize.
- In the upper right corner of the Cloud Shell Terminal panel, click the Open in new window button .
- Click the Open Editor pencil icon ( ) at the top of the pane to view files.
- At the top of the left-hand navigation menu, click the Explorer icon ( ) to open your file explorer.
- Click the Open Folder button.
- In the Open Folder dialog that opens, click OK to select your Qwiklab student account's home folder.
- Close any additional tutorial or Gemini panels that appear on the right side of the screen to save more of your window for your code editor.
- Throughout the rest of this lab, you can work in this window as your IDE with the Cloud Shell Editor and Cloud Shell Terminal.
Download and install ADK and code samples for this lab
-
Paste the following commands into the Cloud Shell Terminal to download code for this lab from a Cloud Storage bucket:
gcloud storage cp -r gs://YOUR_GCP_PROJECT_ID-bucket/adk_tools . -
Update your
PATHenvironment variable, install ADK, and install some additional requirements for this lab by running the following commands in the Cloud Shell Terminal.export PATH=$PATH:"/home/${USER}/.local/bin"
python3 -m pip install -r adk_tools/requirements.txt
Task 2. Create a search app that will be used to ground responses on your own data
In a later task, you will use the Google-provided Vertex AI Search tool to ground responses on your own data in an AI Applications data store. Since the app's data store needs a little while to ingest data, you will set it up now, then use it to ground responses on your data in a later task.
-
In your browser tab still showing the Cloud Console, navigate to AI Applications by searching for it at the top of the console. (Feel free to close any Cloud Shell Terminal or tutorial panels at the bottom or right side of this tab.)
-
Select the terms and conditions checkbox and click Continue and activate the API.
-
From the left-hand navigation menu, select Data Stores.
-
Select Create data store.
-
Find the Cloud Storage card and click Select on it.
-
Under Unstructured Data Import (Document Search & RAG), select Documents.
-
Example documents have been uploaded to Cloud Storage for you. They relate to the fictional discovery of a new planet named Persephone. A fictional planet is used in this case so that the model cannot have learned anything about this planet during its training.
For a GCS path, enter
YOUR_GCP_PROJECT_ID-bucket/planet-search-docs. -
Click Continue.
-
Keep the location set to global.
-
For a data store name, enter: Planet Search.
-
Click Continue.
-
When asked to select the pricing model, keep the default selection and click Create.
-
Click Apps on the left-hand nav.
-
Click Create a new app.
-
Find the card for a Custom search (general) app and click Create.
-
Name the app Planet Search
-
Provide a Company name of Planet Conferences
-
Click Continue.
-
Select the checkbox next to the Planet Search data store.
-
Keep the default pricing terms and select Create.
-
Once your app is created, click AI Applications in the upper left to return to your app dashboard.
-
Copy the ID value of your app displayed in the Apps table. Save it in a text document as you will need it later.
For now, you will give the data store some time to ingest its data. Later you will provide your search app to an agent to ground its responses.
Task 3. Use a Third-Party Tool from the LangChain Community
ADK allows you to use tools available from third-party AI frameworks like LangChain. The LangChain community has created a large number of tool integrations to access many sources of data, integrate with various web products, and accomplish many things. Using community tools within ADK can save you rewriting a tool that someone has already created.
-
Back in your browser tab displaying the Cloud Shell Editor, use the file explorer on the left-hand side to navigate to the directory adk_tools/langchain_tool_agent.
-
Write a .env file to provide authentication details for this agent directory by running the following in the Cloud Shell Terminal:
cd ~/adk_tools
cat << EOF > langchain_tool_agent/.env
GOOGLE_GENAI_USE_VERTEXAI=TRUE
GOOGLE_CLOUD_PROJECT={{{project_0.project_id| YOUR_GCP_PROJECT_ID}}}
GOOGLE_CLOUD_LOCATION=global
MODEL={{{project_0.startup_script.gemini_flash_model_id | gemini_flash_model_id}}}
EOF
-
Copy the
.envfile to the other agent directories you will use in this lab by running the following:cp langchain_tool_agent/.env function_tool_agent/.env
cp langchain_tool_agent/.env vertexai_search_tool_agent/.env
-
Click on the agent.py file in the langchain_tool_agent directory.
-
Notice the import of the
LangchainToolclass. This is a wrapper class that allows you to use LangChain tools within Agent Development Kit. -
Add the following code where indicated in the
agent.pyfile to add the LangChain Wikipedia tool to your agent. This will allow your agent to search for information on Wikipedia:tools = [ # Use the LangchainTool wrapper... LangchainTool( # to pass in a LangChain tool. In this case, the WikipediaQueryRun tool, which requires the WikipediaAPIWrapper as # part of the tool. tool=WikipediaQueryRun( api_wrapper=WikipediaAPIWrapper(), handle_tool_error=True, ) ), ]
-
In the Cloud Shell Terminal, from the adk_tools project directory, launch the Agent Development Kit Dev UI with the following commands:
adk web --allow_origins "regex:https://.*\.cloudshell\.dev" -
To view the web interface in a new tab, click the http://127.0.0.1:8000 link in the Terminal output.
-
A new browser tab will open with the ADK Dev UI.
-
From the Select an agent dropdown on the left, select the langchain_tool_agent from the dropdown.
-
Query the agent with: Who was Grace Hopper?
-
Click the agent icon ( ) next to the agent's chat bubble indicating the use of the wikipedia tool.
-
Notice that the content includes a
functionCallwith the query to Wikipedia. -
At the top of the tab, click the forward button to move to the next event.
-
Exploring this event, you can see the result retrieved from Wikipedia used to generate the model's response.
-
When you are finished asking questions of this agent, close the dev UI browser tab.
-
Select the Cloud Shell Terminal panel and press CTRL + C to stop the server.
Task 4. Use a function as a custom tool
When pre-built tools don't fully meet specific requirements, you can create your own tools. This allows for tailored functionality, such as connecting to proprietary databases or implementing unique algorithms.
The most straightforward way to create a new tool is to write a standard Python function with a docstring written in a standard format and pass it to your model as a tool. This approach offers flexibility and quick integration.
When writing a function to be used as a tool, there are a few important things to keep in mind:
- Parameters: Your function can accept any number of parameters, each of which can be of any JSON-serializable type (e.g., string, integer, list, dictionary). It's important to avoid setting default values for parameters, as the large language model (LLM) does not currently support interpreting them.
-
Return type: The preferred return type for a Python Function Tool is a dictionary. This allows you to structure the response with key-value
pairs,
providing context and clarity to the LLM. For example, instead of returning a numeric error code, return a dictionary with an
"error_message"key containing a human-readable explanation. As a best practice, include a"status"key in your return dictionary to indicate the overall outcome (e.g.,"success","error","pending"), providing the LLM with a clear signal about the operation's state. - Docstring: The docstring of your function serves as the tool's description and is sent to the LLM. Therefore, a well-written and comprehensive docstring is crucial for the LLM to understand how to use the tool effectively. Clearly explain the purpose of the function, the meaning of its parameters, and the expected return values.
Define a function and use it as a tool by completing the following steps:
-
Using the Cloud Shell Editor file explorer, navigate to the directory adk_tools/function_tool_agent.
-
In the function_tool_agent directory, click on the agent.py file.
-
Notice that the functions
get_date()andwrite_journal_entry()have docstrings formatted properly for an ADK agent to know when and how to use them. They include:- A clear description of what each function does
- an
Args:section describing the function's input parameters with JSON-serializable types - a
Returns:section describing what the function returns, with the preferred response type of adict
-
To pass the function to your agent to use as a tool, add the following code where indicated in the
agent.pyfile:tools=[get_date, write_journal_entry]
-
You will run this agent using the dev UI to see how its tools allow you to easily visualize tool requests and responses. In the Cloud Shell Terminal, from the adk_tools project directory, run the dev UI again with the following command (if the server is still running from before, stop the running server first with CTRL+C, then run the following to start it again):
adk web --allow_origins "regex:https://.*\.cloudshell\.dev" -
Click the http://127.0.0.1:8000 link in the Terminal output.
-
A new browser tab will open with the ADK Dev UI.
-
From the Select an agent dropdown on the left, select the function_tool_agent.
-
Start a conversation with the agent with: hello!
-
The agent should prompt you about your day. Respond with a sentence about how your day is going (like It's been a good day. I did a cool ADK lab.) and it will write a journal entry for you.
Example Output:
Show Image
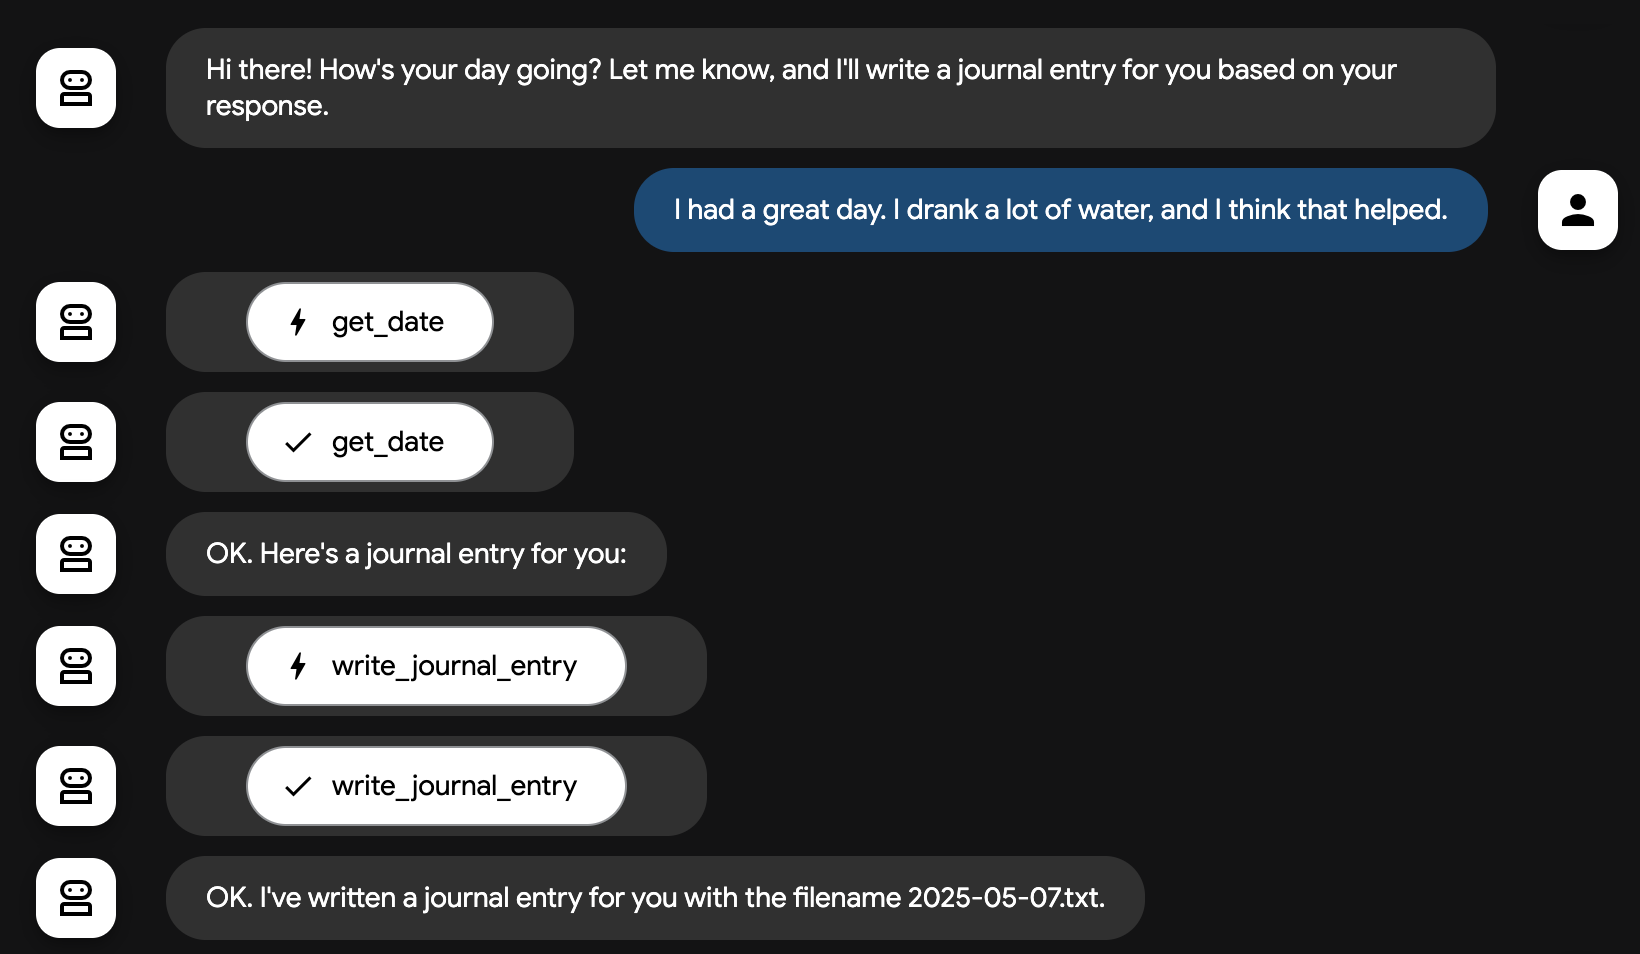
-
Notice that your agent shows buttons for your custom tool's request and the response. You can click on each to see more information about each of these events.
-
Close the dev UI tab.
-
In the Cloud Shell Editor, you can find your dated journal entry file in the adk_tools directory. (You may want to use the Cloud Shell Editor's menu to enable View > Word Wrap to see the full text without lots of horizontal scrolling.)
-
Stop the server, by clicking on the Cloud Shell Terminal panel and pressing CTRL + C.
Best practices for writing functions to be used as tools include
- Fewer Parameters are Better: Minimize the number of parameters to reduce complexity.
-
Use Simple Data Types: Favor primitive data types like
strandintover custom classes when possible. - Use Meaningful Names: The function's name and parameter names significantly influence how the LLM interprets and utilizes the tool. Choose names that clearly reflect the function's purpose and the meaning of its inputs.
-
Break Down Complex Functions: Instead of a single
update_profile(profile: Profile)function, create separate functions likeupdate_name(name: str),update_age(age: int), etc. -
Return status: Include a
"status"key in your return dictionary to indicate the overall outcome (e.g.,"success","error","pending") to provide the LLM a clear signal about the operation's state.
Task 5. Use Vertex AI Search as a tool to ground on your own data
In this task, you will discover how easy it is to deploy a RAG application using an Agent Development Kit agent with the built-in Vertex AI Search tool from Google and the AI Applications data store you created earlier.
-
Return to your Cloud Shell Editor tab and select the adk_tools/vertexai_search_tool_agent directory.
-
Click on the agent.py file in the vertexai_search_tool_agent directory.
-
Add an import of the
VertexAiSearchToolclass where indicated at the bottom of the imports:from google.adk.tools import VertexAiSearchTool -
Update the code where the
VertexAiSearchToolis instantiated. In the path being passed tosearch_engine_id, updateYOUR_PROJECT_IDtoYOUR_GCP_PROJECT_IDand updateYOUR_SEARCH_APP_IDto the search app ID you copied in the earlier task. -
Add the following line where indicated in the agent definition to provide the agent the tool:
tools=[vertexai_search_tool]
- You can confirm your data store is ready for use by selecting the data store's name on the AI Applications > Data Stores page in the console. -The Activity and Documents tabs provide statuses on the import and indexing of your documents. When the Activity tab reports "Import completed", your data store should be ready to query.
-
In the Cloud Shell Terminal, from the adk_tools project directory, launch the command line interface with the following command.
You'll include the
--reload_agentsflag so that the Dev UI reloads your agent when you make changes.adk web --allow_origins "regex:https://.*\.cloudshell\.dev" --reload_agents -
Click the http://127.0.0.1:8000 to open the ADK Dev UI.
-
From the Select an agent dropdown on the left, select the vertexai_search_tool_agent.
-
Query the agent about the fictional planet described in your Cloud Storage documents with:
- Is the new planet Persephone suitable for habitation?
- Response: Based on the "Persephone Survey: What we Know So Far" document, Persephone exhibits several characteristics that suggest it could be habitable ...(Example output. Yours may be a little different)
Using AgentTool to integrate search tools with other tools
Search tools come with an implementation limitation in that you cannot mix search tools and non-search tools in the same agent. To get around this, you can wrap an agent with a search tool with an AgentTool, and then use that agent-as-a-tool to conduct searches alongside other tools.
To see that in action:
-
Ensure you have the adk_tools/vertexai_search_tool_agent/agent.py file open.
-
Update the root_agent's
toolsparameter to include theget_datefunction tool:tools=[vertexai_search_tool, get_date]
-
In the ADK Dev UI, ask the agent: What is today's date?
Expected output:
Show Image

-
Back in the adk_tools/vertexai_search_tool_agent/agent.py file, paste the following code above your root_agent. This agent is dedicated to using the search tool and contains both the search tool and instructions to use it:
  vertexai_search_agent = Agent(
  name="vertexai_search_agent",
  model=Gemini(model=os.getenv("MODEL"), retry_options=RETRY_OPTIONS),
  instruction="Use your search tool to look up facts.",
  tools=[vertexai_search_tool]
  )
-
Then replace the root_agent's tools parameter with the following to wrap the agent created in the previous step with the
AgentTool():tools=[ AgentTool(vertexai_search_agent, skip_summarization=False), get_date ] -
Now you can query your agent and receive both search results and use the
get_date()function.Back in the ADK Dev UI browser tab, click + New Session.
-
Ask again: What is today's date?
The agent should respond with the correct date.
-
Then to invoke the search tool, ask: When is the PlanetCon conference?
Expected output: The PlanetCon: Persephone conference is scheduled for October 26th - 28th, 2028.
-
Feel free to ask the agent more questions about this new planet and the conference where its discovery will be announced. When you are satisfied, close the dev UI tab.
-
When you are finished asking questions of this agent, close the browser tab, select the Cloud Shell Terminal window where the server is running, and press CTRL + C to stop the server.
Even More Types of Tools!
The following tool types are good for you to know about, but you will not implement them in this lab.
The LongRunningFunctionTool Class
This tool is a subclass of FunctionTool. It's designed for tasks that require a significant amount of processing time that should be called without blocking the agent's execution.
When using a LongRunningFunctionTool, your Python function can initiate the long-running operation and optionally return an intermediate result to
keep
the model and user informed about the progress (e.g., status updates or estimated completion time). The agent can then continue with other tasks.
An example is a human-in-the-loop scenario where the agent needs human approval before proceeding with a task.
Application Integration workflows as tools
With Application Integration, you can use a drag-and-drop interface in
the Google Cloud Console to build tools, data connections, and data transformations using Integration Connector’s 100+ pre-built connectors for Google Cloud
products
and third-party systems like Salesforce, ServiceNow, JIRA, SAP, and more. You can then use an ADK ApplicationIntegrationToolset to allow your agents to connect to those sources or
call your workflows.
Model Context Protocol (MCP) Tools
Model Context Protocol (MCP) is an open standard designed to standardize how Large Language Models (LLMs) like Gemini and Claude communicate with external applications, data sources, and tools. ADK helps you both use and consume MCP tools in your agents, whether you're trying to build a tool to call an MCP service, or exposing an MCP server for other developers or agents to interact with your tools.
Refer to the MCP Tools documentation for code samples and design patterns that help you use ADK together with MCP servers, including:
- Using Existing MCP Servers within ADK: An ADK agent can act as an MCP client and use tools provided by external MCP servers.
- Exposing ADK Tools via an MCP Server: How to build an MCP server that wraps ADK tools, making them accessible to any MCP client.
For more information on using MCP with ADK agents, see the lab Use Model Context Protocol (MCP) Tools with ADK Agents.
Congratulations!
In this lab, you've learned to:
- Provide prebuilt Google and LangChain tools to an agent
- Write your own tool functions for an agent
- Discuss the importance of structured docstrings and typing when writing functions for agent tools
Next Steps
To learn more about building and deploying agents using Agent Development Kit, check out these labs:
Google Cloud training and certification
...helps you make the most of Google Cloud technologies. Our classes include technical skills and best practices to help you get up to speed quickly and continue your learning journey. We offer fundamental to advanced level training, with on-demand, live, and virtual options to suit your busy schedule. Certifications help you validate and prove your skill and expertise in Google Cloud technologies.
- In this section we will see how to build multi-agent systems with Google's ADK.
- An agent is an autonomous program that talks to an AI model to perform a goal-based operation using the tools and context it has and is capable of autonomous decision making grounded in truth. When your application has multiple agents working together autonomously and together as required to cater to its larger purpose with each of its agents being independently knowledgeable and responsible for a specific focus area, then your application becomes a multi-agent system.
- In ADK, a multi-agent system is an application where different agents, often forming a hierarchy, collaborate or coordinate to achieve a larger goal.
- Below is what an example of "hierarchy" looks like:
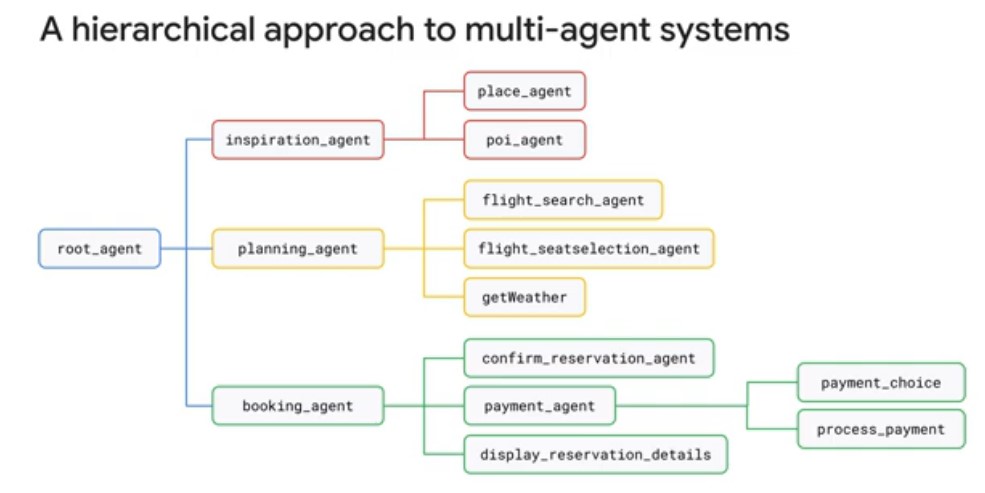
- Agents can only transfer the conversation to sub-agents, back to a parent, or to a peer (another agent that shares the same parent). You can disable transferring to peers on an agent-by-agent basis. This tree structure makes conversations more predictable and reliable. Hypothetically, if you could transfer to any agent, and two agents in different parts of your system were each responsible for similar lookup activities, it might be very easy to call the wrong agent (e.g., an "InventoryLookupAgent" in the Sales department and an "InventoryLookupAgent" in the Warehouse department, an unconstrained system might accidentally trigger the wrong one.)
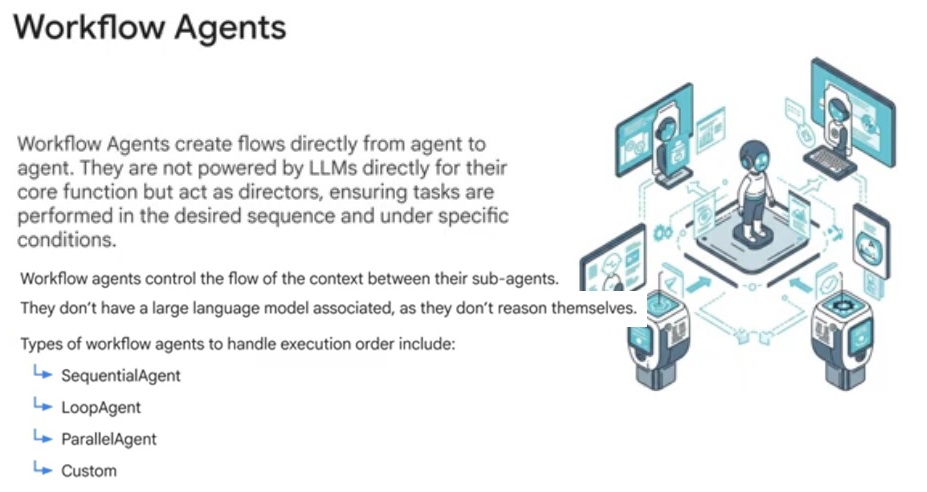
Workflow Agents
:- When building sophisticated AI systems, relying entirely on an LLM to decide every step can sometimes lead to unpredictable behavior. Workflow Agents act as "architectural guardrails," allowing you to define exactly how tasks should be sequenced, repeated, or executed in parallel.
- Workflow Agents are these specialized components designed to control the execution flow of a multi-agent system.
- Workflow agents typically result in deterministic workflow execution. This means that for a given input and configuration, the sequence of agents executed will always be the same.
1)
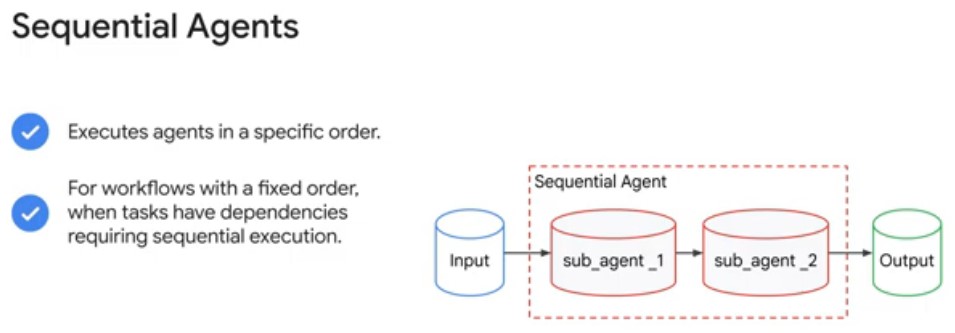
Sequential Agents
:- Sequential Agents execute a predefined list of agents one-after-another in a specific, linear order.
- This is ideal for tasks that require a strict process, such as gathering information, then drafting content, then reviewing it.
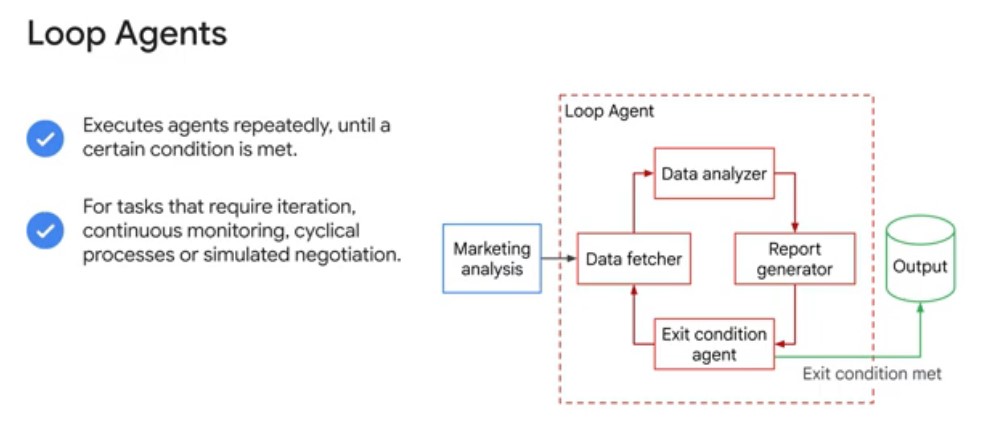
Loop Agents
:- Loop Agents repeatedly execute a set of agents until a certain condition is met.
- Use the Loop Agent when your workflow involves tasks requiring iterative refinement, continuous monitoring, cyclical processes, or simulated negotiation.
- This is commonly used for iterative tasks like "Generator-Critic" patterns, where an agent improves a response based on feedback until it meets a quality threshold.
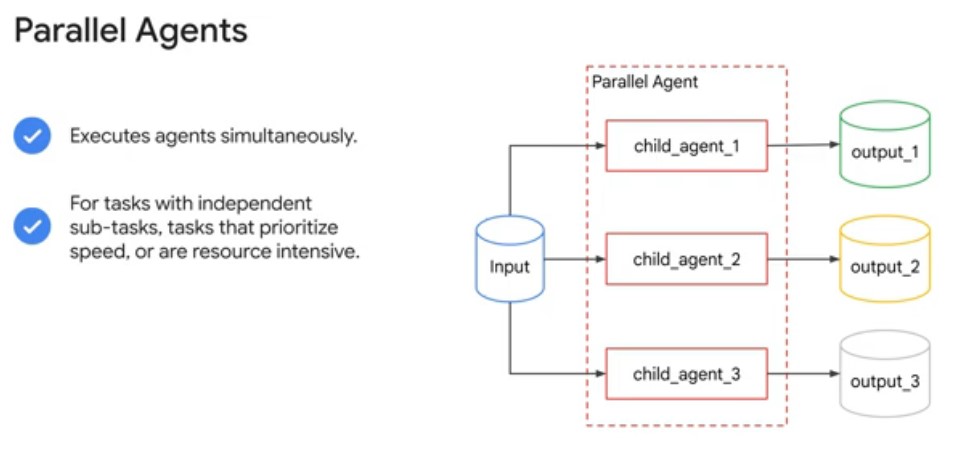
Parallel Agents
:- Parallel Agents can run multiple agents simultaneously.
- This can significantly speed up tasks that can be broken down into independent sub-tasks.
- This approach is particularly beneficial for operations like multi-source data retrieval or heavy computations, where parallelization yields substantial performance gains.
- Importantly, this strategy assumes no inherent need for shared state, or direct information exchange between the concurrently executing agents.
- For example, a Parallel Agent could execute several “Report Generation Agents” in parallel, each responsible for a different region.
Custom Workflow Agents
:- Custom workflow agents in the Agent Development Kit allow you to define arbitrary orchestration logic, going beyond the predefined patterns of Sequential, Loop, and Parallel Agents.
- This provides maximum flexibility for complex workflows, stateful interactions, and integrating custom business rules.
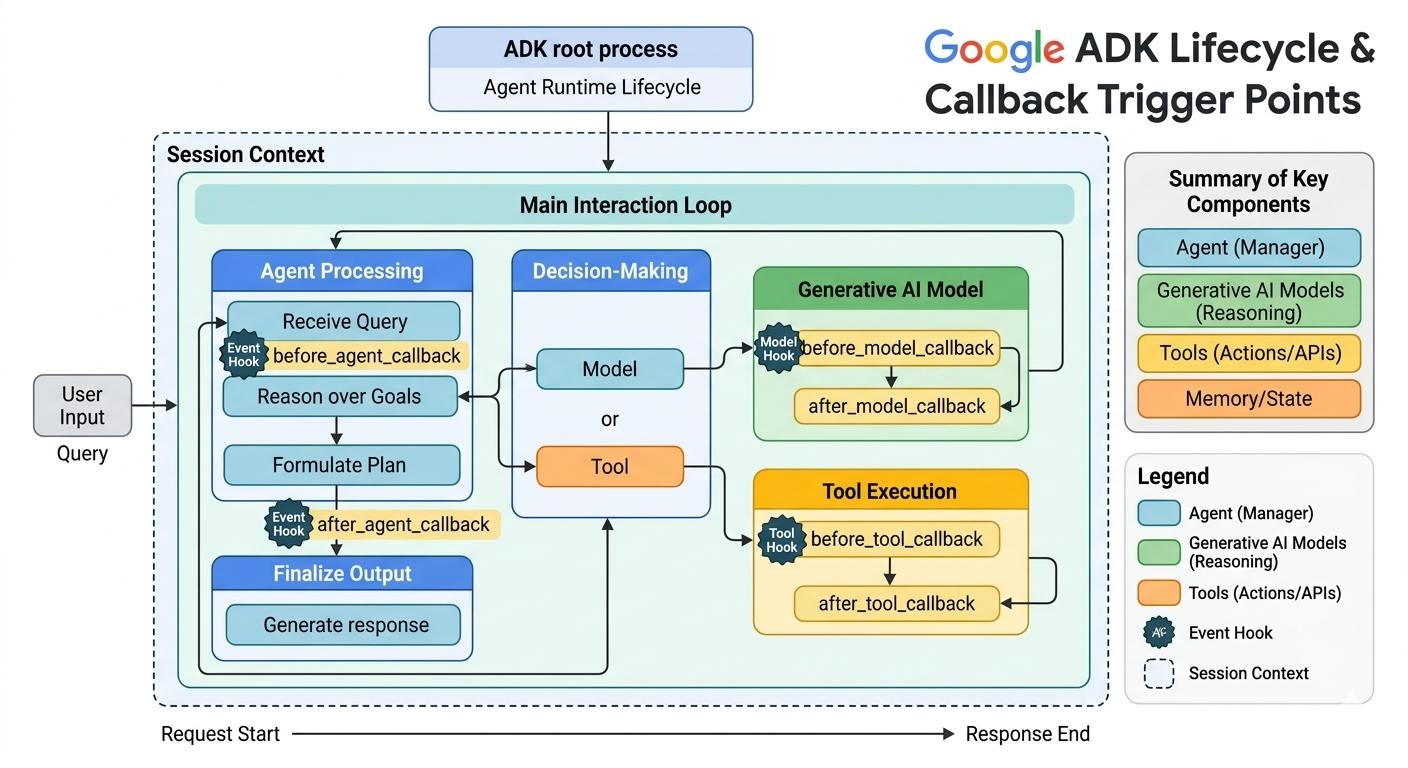
- Callbacks are a mechanism that enable you to interrupt the agent's execution lifecycle, enabling you to observe, modify, or augment the agent's operations directly.
- You define a Python function that takes specific parameters according to which callback hook you are using, then register them with an agent to be called at the appropriate time. The framework automatically invokes these functions at predefined points during an agent's run.
- The framework provides different types of callbacks that trigger at various stages of an agent's execution:
1)
before_agent_callback: - Setting up resources or state needed only for this specific agent's run.
- Performing validation checks on the session state (
callback_context.state) before execution starts. - Logging the entry point of the agent's activity.
- Modifying session state before the agent uses it.
- Can return content to skip the agent's execution.
2)
after_agent_callback: - Cleanup tasks.
- Post execution validation.
- Logging the completion of an agent's activity.
- Modifying the final state.
- Augmenting/replacing the agent's final output.
3)
before_model_callback: - Inspection and modification of the request going to the LLM.
- Adding dynamic instructions.
- Injection few-shot examples based on state.
- Modifying model config.
- Implementing guardrails, like profanity check.
- Implementing request-level caching.
4)
after_model_callback: - Inspection and modification of the raw LLM response.
- Logging model outputs.
- Reformatting responses.
- Censoring sensitive information generated by the model.
- Parsing structured data from the LLM response and storing it in
callback_context.state. - Handling specific error codes.
5)
before_tool_callback: - Inspection and modification of tool arguments.
- Performing authorization checks before execution.
- Logging tool usage attempts.
- Implementing tool-level caching.
6)
after_tool_callback: - Inspection and modification of the tool's result before it's sent back to the LLM (potentially after summarization).
- Logging tool results.
- Post-processing or formatting results.
- Saving specific parts of the result to the session state.
| Category | Callback | Execution Timing | Primary Purpose |
|---|---|---|---|
| Agent Lifecycle Callbacks |
before_agent_callback | Immediately before the agent begins its core logic. | Initializing resources, validating session state, or short-circuiting execution. |
| after_agent_callback | Immediately after the agent finishes its core logic. | Cleanup, post-execution validation, or augmenting the final output. | |
| LLM Interaction Callbacks |
before_model_callback | Before an LLM request is sent. | Inspecting/modifying the model request, or bypassing the model call. |
| after_model_callback | After the LLM returns a response. | Reformatting responses, parsing structured data, or censoring sensitive content. | |
| Tool Execution Callbacks |
before_tool_callback | Before a tool execution begins. | Validating tool arguments, authorization checks, or implementing caching. |
| after_tool_callback | After a tool returns its result. | Post-processing tool data or modifying the response before it reaches the model. |
Response:
To understand how the ADK lifecycle functions, let's trace a hypothetical request: Check my flight status and email me the arrival time.
-
Request Start & Agent Initialization: The User Input enters the system. The
before_agent_callbackis triggered immediately, where the system might authenticate the user or load their profile from Memory. The Agent (Manager) receives the intent. -
Decision-Making (Reasoning & Planning): The Agent assesses the goal: it needs to (a) find the flight status and (b) send an email. It reasons that it needs an
external tool. Before reaching out to the LLM to process the flight search, the
before_model_callbackfires, perhaps to check if the request contains PII (Personally Identifiable Information) that needs masking. The LLM then generates the necessary tool call. -
Tool Execution: The system now pivots to Tool Execution to get real-time flight data. The
before_tool_callbacktriggers, allowing the system to verify if the Agent has the necessary permissions to access the Flight API. The API is called. Once the flight data returns (e.g., "Flight UA123 arrives at 5:00 PM"), theafter_tool_callbackfires, allowing the system to reformat the raw JSON response into a cleaner format for the LLM to read. - Planning & Iteration (The Loop): The agent now has the information. It looks at the second part of the goal: "Email the arrival time." It decides to invoke an Email tool. The system repeats the Tool Hook cycle for the Email API.
- Finalize Output: Once all tools have successfully executed, the Agent consolidates the gathered info into a final human-readable response: Your flight UA123 arrives at 5:00 PM, and I have sent those details to your email.
-
After-Agent Callback: Before the final text is displayed to the user, the
after_agent_callbackis triggered. This is the final safety gate—the system might perform a "toxicity check" to ensure the tone is professional, or log the entire conversation to the Artifact/Trace database for future debugging.
- Create multiple agents and relate them to one another with parent to sub-agent relationships.
- Build content across multiple turns of conversation and multiple agents by writing to a session's state dictionary.
- Instruct agents to read values from the session state to use as context for their responses.
- Use workflow agents to pass the conversation between agents directly.
- Lab copied over from the tutorial.
- Code repo in private repo: On Github.
Overview
This lab covers orchestrating multi-agent systems within the Google Agent Development Kit (Google ADK).
Multi-Agent Systems
The Agent Development Kit empowers developers to get more reliable, sophisticated, multi-step behaviors from generative models. Instead of writing long, complex prompts that may not deliver results reliably, you can construct a flow of multiple, simple agents that can collaborate on complex problems by dividing tasks and responsibilities.
This architectural approach offers several key advantages such as:
- Easier to design: You can think in terms of agents with specific jobs and skills.
- Specialized functions with more reliable performance: Specialized agents can learn from clear examples to become more reliable at their specific tasks.
- Organization: Dividing the workflow into distinct agents allows for a more organized, and therefor easier to think about, approach.
- Improvability and maintainability: It is easier to improve or fix a specialized component rather than make changes to a complex agent that may fix one behavior but might impact others.
- Modularity: Distinct agents from one workflow can be easily copied and included in other similar workflows.
The Hierarchical Agent Tree
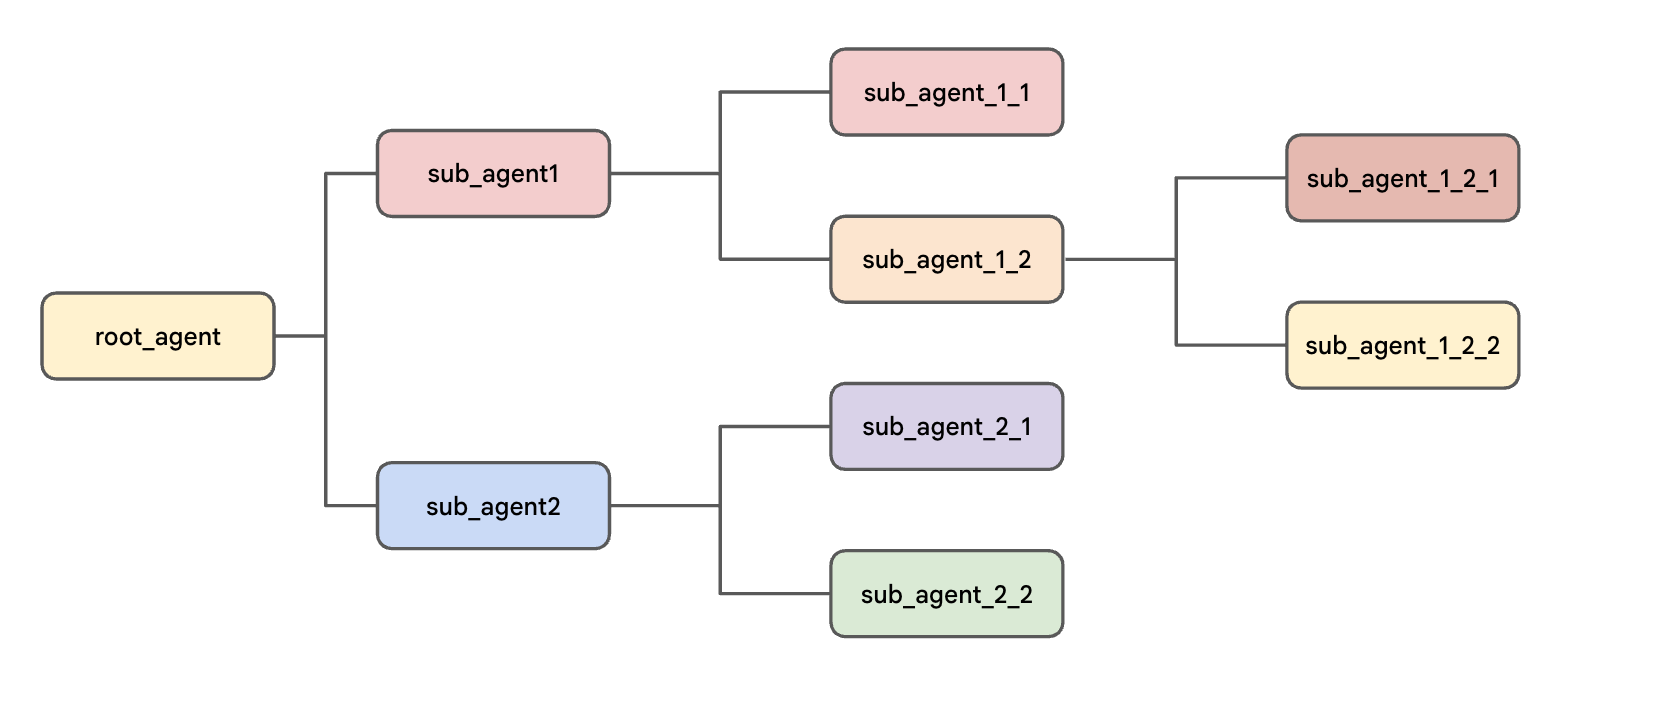
In Agent Development Kit, you organize your agents in a tree-like structure. This helps limit the options for transfers for each agent in the tree, making it easier to control and predict the possible routes the conversation can take through the tree. Benefits of the hierarchical structure include:
- It draws inspiration from real-world collaborative teams, making it easier to design and reason about the behavior of the multi-agent system.
- It is intuitive for developers, as it mirrors common software development patterns.
- It provides greater control over the flow of information and task delegation within the system, making it easier to understand possible pathways and debug the system. For example, if a system has two report-generation agents at different parts of its flow with similar descriptions, the tree structure makes it easier to ensure that the correct one is invoked.
The structure always begins with the agent defined in the root_agent variable (although it may have a different user-facing name
to
identify itself). The root_agent may act as a parent to one or more sub-agents. Each sub-agent agent may have its own
sub-agents.
Task 1. Install ADK and set up your environment
In this lab environment, the Vertex AI API has been enabled for you. If you were to follow these steps in your own project, you would enable it by navigating to Vertex AI and following the prompt to enable it.
Prepare a Cloud Shell Editor tab
- With your Google Cloud console window selected, open Cloud Shell by pressing the G key and then the S key on your keyboard. Alternatively, you can click the Activate Cloud Shell button ( ) in the upper right of the Cloud console.
- Click Continue.
- When prompted to authorize Cloud Shell, click Authorize.
- In the upper right corner of the Cloud Shell Terminal panel, click the Open in new window button .
- Click the Open Editor pencil icon ( ) at the top of the pane to view files.
- At the top of the left-hand navigation menu, click the Explorer icon ( ) to open your file explorer.
- Click the Open Folder button.
- In the Open Folder dialog that opens, click OK to select your Qwiklab student account's home folder.
- Close any additional tutorial or Gemini panels that appear on the right side of the screen to save more of your window for your code editor.
- Throughout the rest of this lab, you can work in this window as your IDE with the Cloud Shell Editor and Cloud Shell Terminal.
Download and install ADK and code samples for this lab
-
Paste the following commands into the Cloud Shell Terminal to copy code files from a Cloud Storage bucket for this lab:
gcloud storage cp -r gs://YOUR_GCP_PROJECT_ID-bucket/* . -
Update your
PATHenvironment variable, install ADK, and install additional lab requirements by running the following commands in the Cloud Shell Terminal.export PATH=$PATH:"/home/${USER}/.local/bin"
python3 -m pip install google-adk[otel-gcp]==1.30.0 -r adk_multiagent_systems/requirements.txt
Task 2. Explore transfers between parent, sub-agent, and peer agents
The conversation always begins with the agent defined as the root_agent variable.
The default behavior of a parent agent is to understand the description of each sub-agent and determine if control of the conversation should be transferred to a sub-agent at any point.
You can help guide those transfers in the parent's instruction by referring to the sub-agents by name (the values of their name
parameter,
not their variable names). Try an example:
-
In the Cloud Shell Terminal, run the following to create a
.envfile to authenticate the agent in the parent_and_subagents directory.cd ~/adk_multiagent_systems
cat << EOF > parent_and_subagents/.env
GOOGLE_GENAI_USE_VERTEXAI=TRUE
GOOGLE_CLOUD_PROJECT=YOUR_GCP_PROJECT_ID
GOOGLE_CLOUD_LOCATION=global
MODEL=gemini_flash_model_id
EOF
-
Run the following command to copy that
.envfile to the workflow_agents directory, which you will use later in the lab:cp parent_and_subagents/.env workflow_agents/.env -
In the Cloud Shell Editor file explorer pane, navigate to the adk_multiagent_systems/parent_and_subagents directory.
-
Click on the agent.py file to open it.
Tip: Because Python code requires that we define our sub-agents before we can add them to an agent, in order to read an agent.py file in the order of the conversation flow, you may want to start reading with the bottom agent and work back towards the top.
-
Notice that there are three agents here:
- a root_agent named
steering(its name is used to identify it in ADK's dev UI and command line interfaces). It asks the user a question (if they know where they'd like to travel or if they need some help deciding), and the user's response to that question will help this steering agent know which of its two sub-agents to steer the conversation towards. Notice that it only has a simpleinstructionthat does not mention the sub-agents, but it is aware of its sub-agents' descriptions. - a travel_brainstormer that helps the user brainstorm destinations if they don't know where they would like to visit.
- an attractions_planner that helps the user build a list of things to do once they know which country they would like to visit.
- a root_agent named
-
Make travel_brainstormer and attractions_planner sub-agents of the root_agent by adding the following line to the creation of the root_agent:
sub_agents=[travel_brainstormer, attractions_planner] -
Save the file.
-
Note that you don't add a corresponding parent parameter to the sub-agents. The hierarchical tree is defined only by specifying
sub_agentswhen creating parent agents. -
In the Cloud Shell Terminal, run the following to use the ADK command line interface to chat with your agent:
cd ~/adk_multiagent_systemsadk run parent_and_subagents -
When you are presented the
[user]:prompt, greet the agent with: hello!Example output (yours may be a little different):
user: hello
[steering]: Hi there! Do you already have a country in mind for your trip, or would you like some help deciding where to go? -
Tell the agent: I could use some help deciding.
Example output (yours may be a little different):
user: I could use some help deciding.
[travel_brainstormer]: Okay! To give you the best recommendations, I need to understand what you're looking for in a trip. -
Notice from the name [travel_brainstormer] in brackets in the response that the root_agent (named [steering]) has transferred the conversation to the appropriate sub-agent based on that sub-agent's
descriptionalone. -
At the
user:prompt, enter exit to end the conversation. -
You can also provide your agent more detailed instructions about when to transfer to a sub-agent as part of its
instructions. In the agent.py file, add the following lines to the root_agent'sinstruction:If they need help deciding, send them to 'travel_brainstormer'. If they know what country they'd like to visit, send them to the 'attractions_planner'. -
Save the file.
-
In the Cloud Shell Terminal, run the following to start the command line interface again:
adk run parent_and_subagents -
Greet the agent with: hello!
-
Reply to the agent's greeting with: I would like to go to Japan.
Example output (yours may be a little different):
[attractions_planner]: Okay, I can help you with that! Here are some popular attractions in Japan: Tokyo, Senso-ji Temple, Shibuya Crossing, Tokyo Skytree, Kyoto -
Notice that you have been transferred to the other sub-agent, attractions_planner.
-
Reply with: Actually I don't know what country to visit.
Example output (yours may be a little different):
[travel_brainstormer]: Okay! I can help you brainstorm some countries for travel... -
Notice you have been transferred to the travel_brainstormer agent, which is a peer agent to the attractions_planner. This is allowed by default. If you wanted to prevent transfers to peers, you could have set the
disallow_transfer_to_peersparameter toTrueon the attractions_planner agent. -
At the user prompt, type
exitto end the session.
Step-by-step pattern: If you are interested in an agent that guides a user through a process step-by-step, one useful pattern can be to make the first step
the
root_agent with the second step agent its only sub-agent, and continue with each additional step being the only sub-agent of the previous step's agent.
Task 3. Use session state to store and retrieve specific information
Each conversation in ADK is contained within a Session that all agents involved in the conversation can access. A session includes the conversation
history, which agents read as part of the context used to generate a response. The session also includes a session state dictionary that you can
use
to take greater control over the most important pieces of information you would like to highlight and how they are accessed.
This can be particularly helpful to pass information between agents or to maintain a simple data structure, like a list of tasks, over the course of a conversation with a user.
To explore adding to and reading from state:
-
Return to the file
adk_multiagent_systems/parent_and_subagents/agent.py -
Paste the following function definition after the
# Toolsheader:def save_attractions_to_state( tool_context: ToolContext, attractions: List[str] ) -> dict[str, str]: """Saves the list of attractions to state["attractions"]. Args: attractions [str]: a list of strings to add to the list of attractions Returns: None """ # Load existing attractions from state. If none exist, start an empty list existing_attractions = tool_context.state.get("attractions", []) # Update the 'attractions' key with a combo of old and new lists. # When the tool is run, ADK will create an event and make # corresponding updates in the session's state. tool_context.state["attractions"] = existing_attractions + attractions # A best practice for tools is to return a status message in a return dict return {"status": "success"} -
In this code, notice:
- The session is passed to your tool function as
ToolContext. All you need to do is assign a parameter to receive it, as you see here with the parameter namedtool_context. You can then usetool_contextto access session information like conversation history (throughtool_context.events) and the session state dictionary (throughtool_context.state). When thetool_context.statedictionary is modified by your tool function, those changes will be reflected in the session's state after the tool finishes its execution. - The docstring provides a clear description and sections for argument and return values.
- The commented function code demonstrates how easy it is to make updates to the state dictionary.
- The session is passed to your tool function as
-
Add the tool to the attractions_planner agent by adding the
toolsparameter when the agent is created:tools=[save_attractions_to_state] -
Add the following bullet points to the attractions_planner agent's existing
instruction:- When they reply, use your tool to save their selected attraction and then provide more possible attractions.
- If they ask to view the list, provide a bulleted list of { attractions? } and then suggest some more. -
Notice the section in curly braces:
{ attractions? }. This ADK feature, key templating, loads the value of theattractionskey from the state dictionary. The question mark after theattractionskey prevents this from erroring if the field is not yet present. -
You will now run the agent from the web interface, which provides a tab for you to see the changes being made to the session state. Launch the Agent Development Kit Web UI with the following command:
adk web --allow_origins "regex:https://.*\.cloudshell\.dev" -
To view the web interface in a new tab, click the http://127.0.0.1:8000 link in the Terminal output.
-
A new browser tab will open with the ADK Dev UI.
-
From the Select an agent dropdown on the left, select the parent_and_subagents agent from the dropdown.
-
Start the conversation with: hello
-
After the agent greets you, reply with: I'd like to go to Egypt.
You should be transferred to the attractions_planner and be provided a list of attractions.
-
Choose an attraction, for example: I'll go to the Sphinx
-
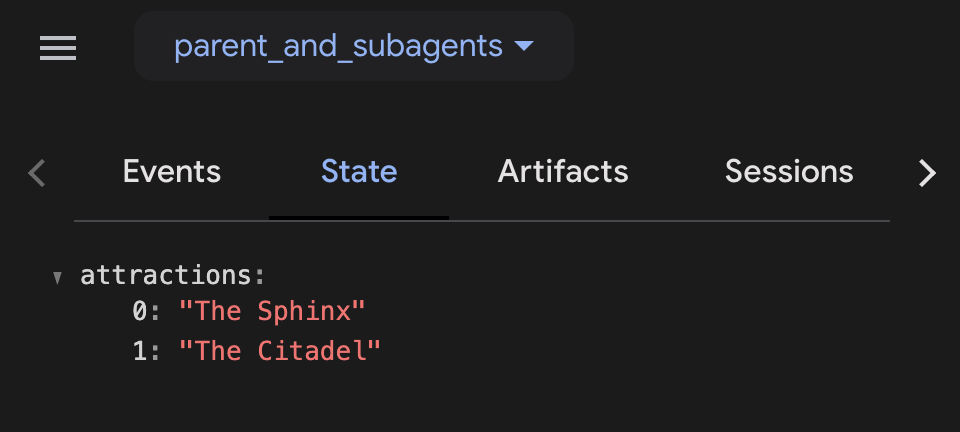
You should receive an acknowledgement in the response, like: Okay, I've saved The Sphinx to your list. Here are some other attractions...
-
Click the response tool box (marked with a check mark) to view the event created from the tool's response. Notice that it includes an actions field which includes state_delta describing the changes to the state.
-
You should be prompted by the agent to select more attractions. Reply to the agent by naming one of the options it has presented.
-
On the left-hand navigation menu, click the "X" to exit the focus on the event you inspected earlier.
-
Now in the sidebar, you should see the list of events and a few tab options. Select the State tab. Here you can view the current state, including your attractions array with the two values you have requested.
Show Image
-
Send this message to the agent: What is on my list?
-
It should return your list formatted as a bulleted list according to its
instruction. -
When you are finished experimenting with the agent, close the web browser tab and press CTRL + C in the Cloud Shell Terminal to stop the server.
Later in this lab, you will demonstrate how to use state to communicate between agents.
Instead of saving small pieces of information, if you would like to store your agent's entire text response in the state dictionary, you can set an
output_keyparameter when you define the agent, and its entire output will be stored in the state dictionary under that field name.
Workflow Agents
Parent to sub-agent transfers are ideal when you have multiple specialist sub-agents, and you want the user to interact with each of them.
However, if you would like agents to act one-after-another without waiting for a turn from the user, you can use workflow agents. Some example scenarios when you might use workflow agents include when you would like your agents to:
- Plan and Execute: When you want to have one agent prepare a list of items, and then have other agents use that list to perform follow-up tasks, for example writing sections of a document
- Research and Write: When you want to have one agent call functions to collect contextual information from Google Search or other data sources, then another agent use that information to produce some output.
- Draft and Revise: When you want to have one agent prepare a draft of a document, and then have other agents check the work and iterate on it
To accomplish these kinds of tasks, workflow agents have sub-agents and guarantee that each of their sub-agents acts. Agent Development Kit provides three built-in workflow agents and the opportunity to define your own:
SequentialAgentLoopAgentParallelAgent
Throughout the rest of this lab, you will build a multi-agent system that uses multiple LLM agents, workflow agents, and tools to help control the flow of the agent.
Specifically, you will build an agent that will develop a pitch document for a new hit movie: a biographical film based on the life of a historical character. Your sub-agents will handle the research, an iterative writing loop with a screenwriter and a critic, and finally some additional sub-agents will help brainstorm casting ideas and use historical box office data to make some predictions about box office results.
In the end, your multi-agent system will look like this:
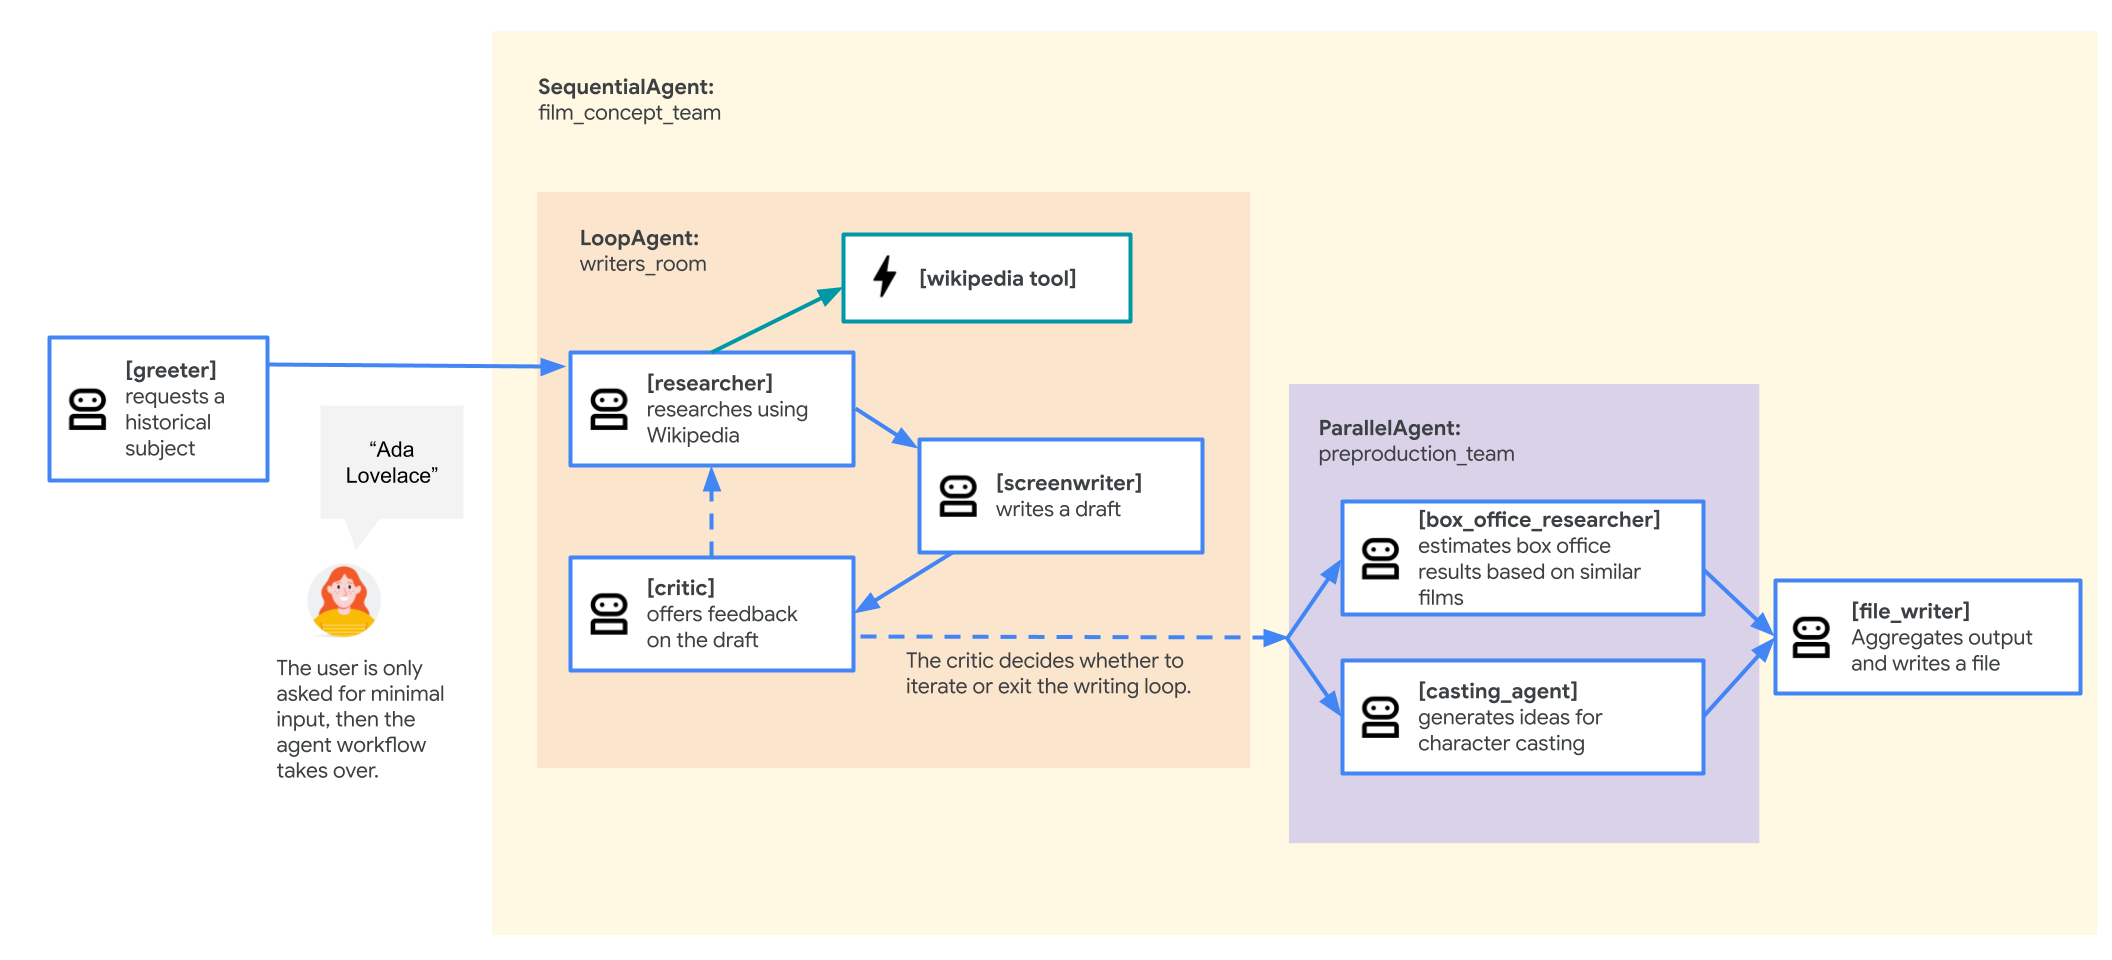
But you will begin with a simpler version.
Task 4. Begin building a multi-agent system with a SequentialAgent
The SequentialAgent executes its sub-agents in a linear sequence. Each sub-agent in its sub_agents list is run, one after the other, in
the
order they are defined.
This is ideal for workflows where tasks must be performed in a specific order, and the output of one task serves as the input for the next.
In this task, you will run a SequentialAgent to build a first version of your movie pitch-development multi-agent system. The first draft of your
agent
will be structured like this:
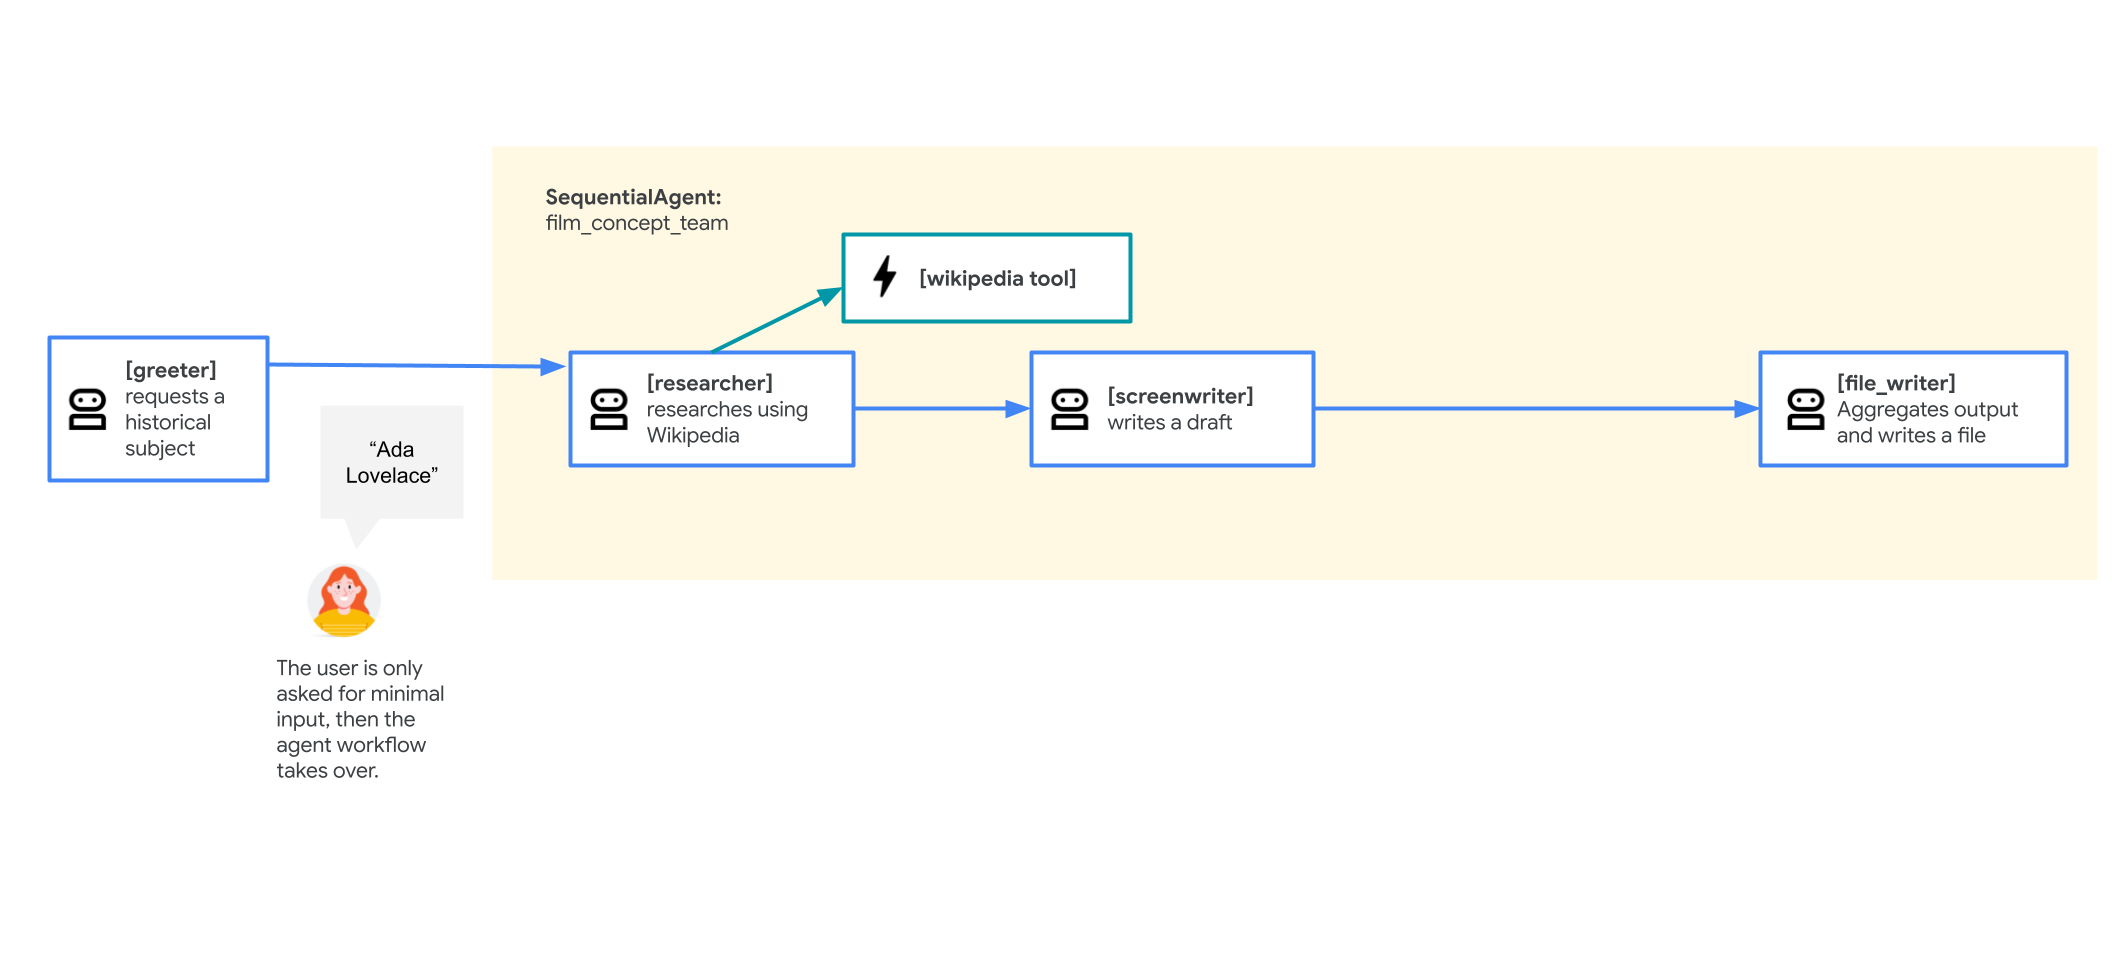
-
A root_agent named greeter to welcome the user and request a historical character as a movie subject
-
A
SequentialAgentcalled film_concept_team will include:- A researcher to learn more about the requested historical figure from Wikipedia, using a LangChain tool covered in the lab Empower ADK agents with tools. An agent can choose to call its tool(s) multiple times in succession, so the researcher can take multiple turns in a row if it determines it needs to do more research.
- A screenwriter to turn the research into a plot outline.
- A file_writer to title the resulting movie and write the results of the sequence to a file.
-
In the Cloud Shell Editor, navigate to the directory adk_multiagent_systems/workflow_agents.
-
Click on the agent.py file in the workflow_agents directory.
-
Read through this agent definition file. Because sub-agents must be defined before they can be assigned to a parent, to read the file in the order of the conversational flow, you can read the agents from the bottom of the file to the top.
-
You also have a function tool append_to_state. This function allows agents with the tool the ability to add content to a dictionary value in state. It is particularly useful for agents that might call a tool multiple times or act in multiple passes of a
LoopAgent, so that each time they act their output is stored. -
Try out the current version of the agent by launching the web interface from the Cloud Shell Terminal. You will use the
--reload_agentsargument to enable live reloading of agents based on agent changes:cd ~/adk_multiagent_systems
adk web --allow_origins "regex:https://.*\.cloudshell\.dev" --reload_agents -
To view the web interface in a new tab, click the http://127.0.0.1:8000 link in the Terminal output.
-
A new browser tab will open with the ADK Dev UI.
-
From the Select an agent dropdown on the left, select workflow_agents.
-
Start the conversation with:
hello. It may take a few moments for the agent to respond, but it should request you enter a historical figure to start your film plot generation. -
When prompted to enter a historical figure, you can enter one of your choice or use one of these examples:
-
Zhang Zhongjing- a renowned Chinese physician from the 2nd Century CE. -
Ada Lovelace- an English mathematician and writer known for her work on early computers -
Marcus Aurelius- a Roman emperor known for his philosophical writings.
-
-
The agent should now call its agents one after the other as it executes the workflow and writes the plot outline file to your ~/adk_multiagent_systems/movie_pitches directory. It should inform you when it has written the file to disk.
If you don't see the agent reporting that it generated a file for you or want to try another character, you can click + New Session in the upper right and try again.
-
View the agent's output in the Cloud Shell Editor. (You may need to use the Cloud Shell Editor's menu to enable View > Word Wrap to see the full text without lots of horizontal scrolling.)
-
In the ADK Dev UI, click on one of the agent icons ( ) representing a turn of conversation to bring up the event view.
-
The event view provides a visual representation of the tree of agents and tools used in this session. You may need to scroll in the event panel to see the full plot.
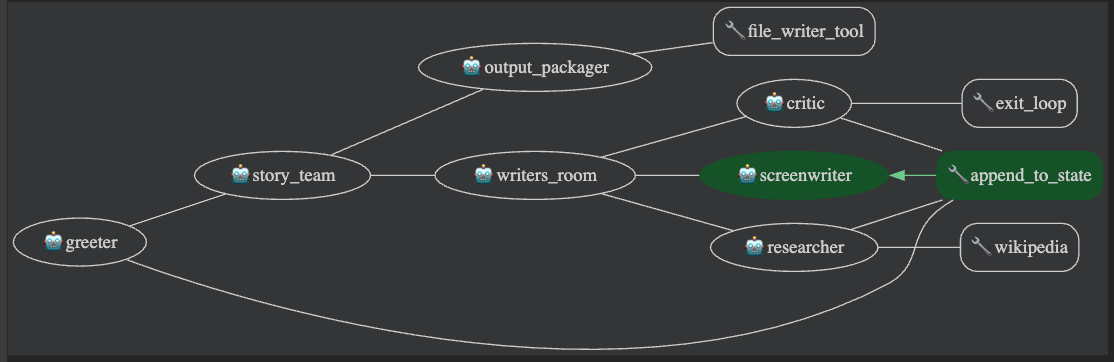
- In addition to the graph view, you can click on the Request tab of the event to see the information this agent received as part of its request, including the conversation history.
- You can also click on the Response tab of the event to see what the agent returned. Note: While this system can produce interesting results, it is not intended to imply that instructions can be so brief or adding examples can be skipped. The system's reliability would benefit greatly from the additional layer of adding more rigorous instructions and examples for each agent.
Task 5. Add a LoopAgent for iterative work
The LoopAgent executes its sub-agents in a defined sequence and then starts at the beginning of the sequence again without breaking for a user input.
It
repeats the loop until a number of iterations has been reached or a call to exit the loop has been made by one of its sub-agents (usually by calling a built-in
exit_loop tool).
This is beneficial for tasks that require continuous refinement, monitoring, or cyclical workflows. Examples include:
- Iterative Refinement: Continuously improve a document or plan through repeated agent cycles.
- Continuous Monitoring: Periodically check data sources or conditions using a sequence of agents.
- Debate or Negotiation: Simulate iterative discussions between agents to reach a better outcome.
You will add a LoopAgent to your movie pitch agent to allow multiple rounds of research and iteration while crafting the story. In addition to
refining
the script, this allows a user to start with a less specific input: instead of suggesting a specific historical figure, they might only know they want a story about
an ancient doctor, and a research-and-writing iteration loop will allow the agents to find a good candidate, then work on the story.
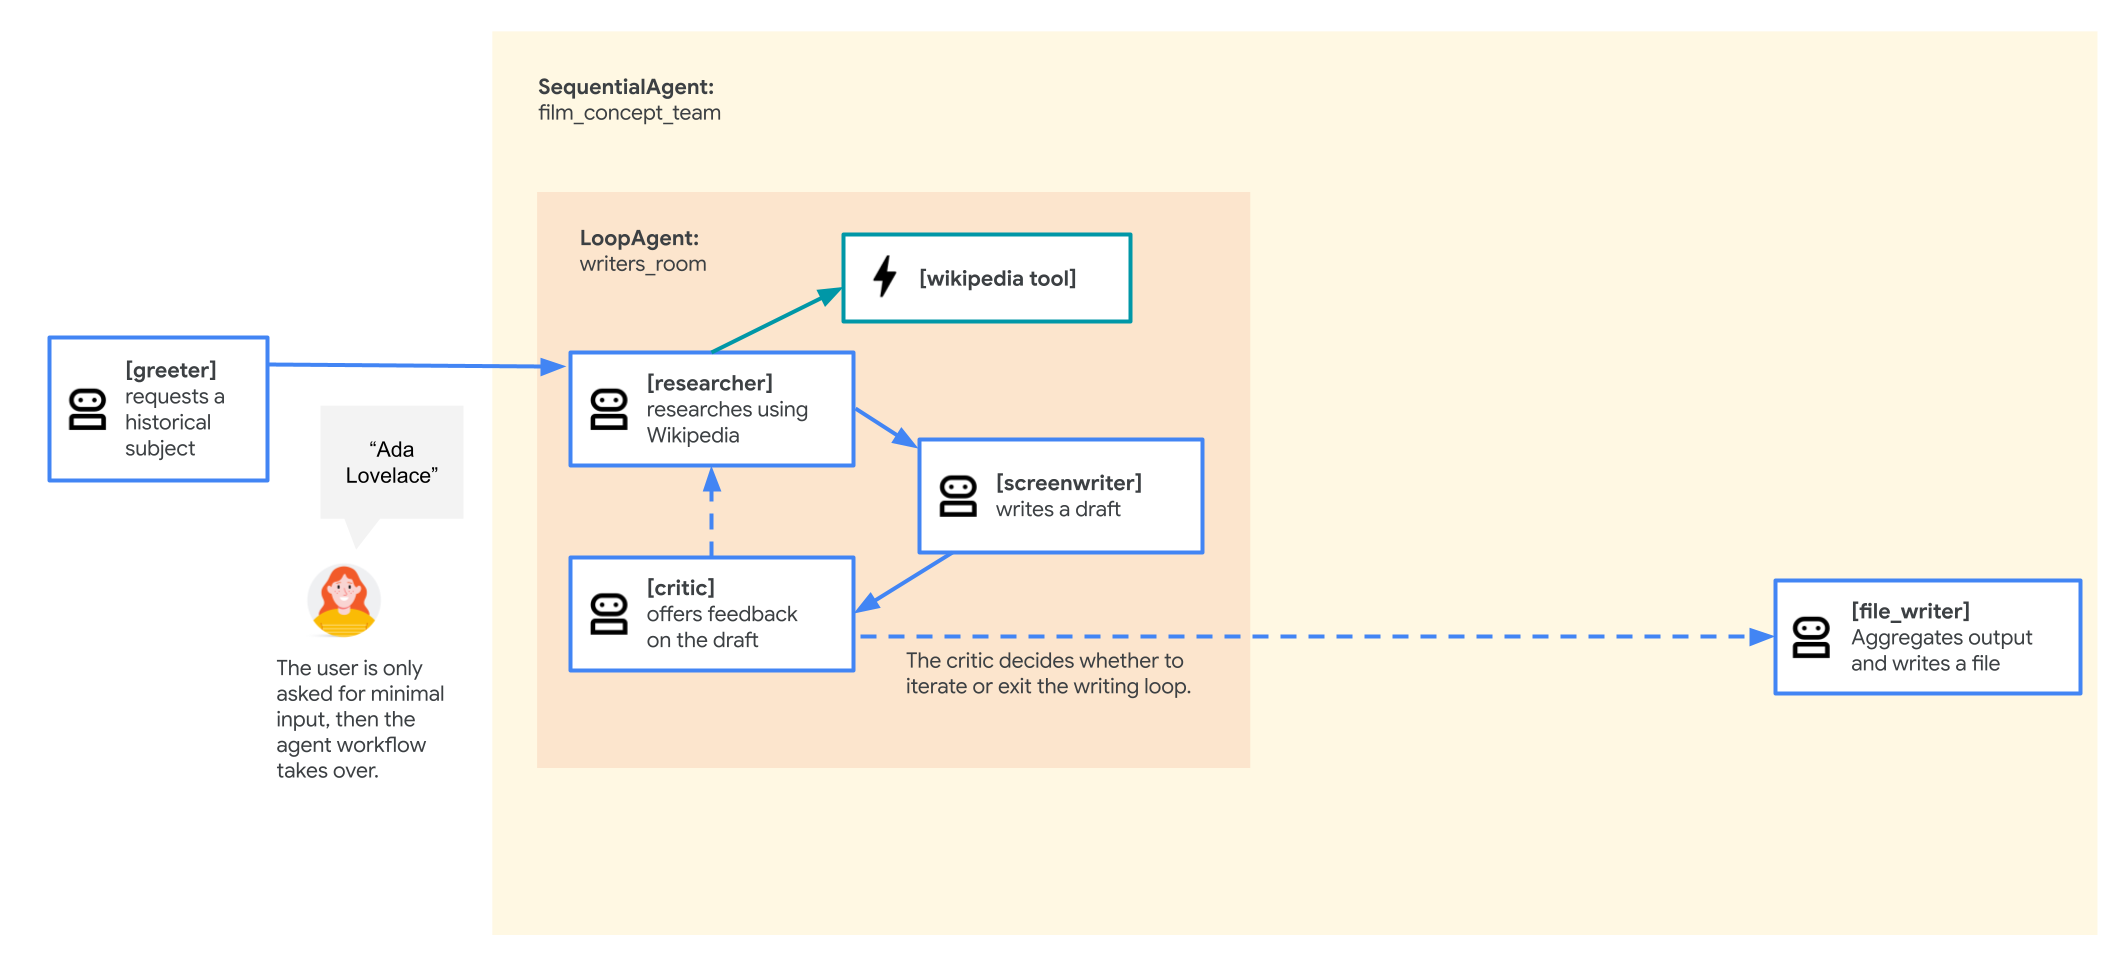
Your revised agent will flow like this:
- The root_agent greeter will remain the same.
- The film_concept_team
SequentialAgentwill now consist of:- A writers_room
LoopAgentthat will begin the sequence. It will consist of:- The researcher will be the same as before.
- The screenwriter will be similar to before.
- A critic that will offer critical feedback on the current draft to motivate the next round of research and improvement through the loop.
- When the loop terminates, it will escalate control of the conversation back to the film_concept_team
SequentialAgent, which will then pass control to the next agent in its sequence: the file_writer that will remain as before to give the movie a title and write the results of the sequence to a file.
- A writers_room
To make these changes:
-
In the
adk_multiagent_systems/workflow_agents/agent.pyfile, add this tool import so that you can provide an agent the ability to exit the loop when desired:from google.adk.tools import exit_loop from google.adk.models import Gemini -
To determine when to exit the loop, add this critic agent to decide when the plot outline is ready. Paste the following new agent into the agent.py file under the # Agents section header (without overwriting the existing agents). Note that it has the
exit_looptool as one of its tools and instructions on when to use it:critic = Agent( name="critic", model=Gemini(model=model_name, retry_options=RETRY_OPTIONS), description="Reviews the outline so that it can be improved.", instruction=""" INSTRUCTIONS: Consider these questions about the PLOT_OUTLINE: - Does it meet a satisfying three-act cinematic structure? - Do the characters' struggles seem engaging? - Does it feel grounded in a real time period in history? - Does it sufficiently incorporate historical details from the RESEARCH? If the PLOT_OUTLINE does a good job with these questions, exit the writing loop with your 'exit_loop' tool. If significant improvements can be made, use the 'append_to_state' tool to add your feedback to the field 'CRITICAL_FEEDBACK'. Explain your decision and briefly summarize the feedback you have provided. PLOT_OUTLINE: { PLOT_OUTLINE? } RESEARCH: { research? } """, before_model_callback=log_query_to_model, after_model_callback=log_model_response, tools=[append_to_state, exit_loop] ) -
Create a new
LoopAgentcalled writers_room that creates the iterative loop of the researcher, screenwriter, and critic. Each pass through the loop will end with a critical review of the work so far, which will prompt improvements for the next round. Paste the following above the existing film_concept_teamSequentialAgent.writers_room = LoopAgent( name="writers_room", description="Iterates through research and writing to improve a movie plot outline.", sub_agents=[ researcher, screenwriter, critic ], max_iterations=5, ) -
Note that the
LoopAgentcreation includes a parameter formax_iterations. This defines how many times the loop will run before it ends. Even if you plan to interrupt the loop via another method, it is a good idea to include a cap on the total number of iterations. -
Update the film_concept_team
SequentialAgentto replace the researcher and screenwriter with the writers_roomLoopAgentyou just created. The file_writer agent should remain at the end of the sequence. The film_concept_team should now look like this:film_concept_team = SequentialAgent( name="film_concept_team", description="Write a film plot outline and save it as a text file.", sub_agents=[ writers_room, file_writer ], ) -
Return to the ADK Dev UI tab and click the + New Session button in the upper right to start a new session.
-
Begin a new conversation with:
hello -
When prompted to choose a kind of historical character, choose one that interests you. Some ideas include:
an industrial designer who made products for the massesa cartographer (a map maker)that guy who made crops yield more food
-
Once you have chosen a type of character, the agent should work its way through iterations of the loop and finally give the film a title and write the outline to a file.
-
Using the Cloud Shell Editor, review the file generated, which should be saved in the adk_multiagent_systems/movie_pitches directory. (Once again, you may need to use the Editor's menu to enable View > Word Wrap to see the full text without lots of horizontal scrolling.)
Task 6. Use a "fan out and gather" pattern for report generation with a ParallelAgent
The ParallelAgent enables concurrent execution of its sub-agents. Each sub-agent operates in its own branch, and by default, they do not share
conversation history or state directly with each other during parallel execution.
This is valuable for tasks that can be divided into independent sub-tasks that can be processed simultaneously. Using a ParallelAgent can
significantly
reduce the overall execution time for such tasks.
In this lab, you will add some supplemental reports -- some research on potential box office performance and some initial ideas on casting -- to enhance the pitch for your new film.

Your revised agent will flow like this:
- The greeter will the same.
- The film_concept_team
SequentialAgentwill now consist of:- The writers_room
LoopAgent, which will remain the same including:- The researcher agent
- The screenwriter agent
- The critic agent
- Your new preproduction_team
ParallelAgentwill then act, consisting of:- A box_office_researcher agent to use historical box office data to generate a report on potential box office performance for this film
- A casting_agent agent to generate some initial ideas on casting based on actors who have starred in similar films
- The file_writer that will remain as before to write the results of the sequence to a file.
- The writers_room
While much of this example demonstrates creative work that would be done by human teams, this workflow represents how a complex chain of tasks can be broken across several sub-agents to produce drafts of complex documents which human team members can then edit and improve upon.
-
Paste the following new agents and
ParallelAgentinto your workflow_agents/agent.py file under the# Agentsheader:box_office_researcher = Agent( name="box_office_researcher", model=Gemini(model=model_name, retry_options=RETRY_OPTIONS), description="Considers the box office potential of this film", instruction=""" PLOT_OUTLINE: { PLOT_OUTLINE? } INSTRUCTIONS: Write a report on the box office potential of a movie like that described in PLOT_OUTLINE based on the reported box office performance of other recent films. """, output_key="box_office_report" ) casting_agent = Agent( name="casting_agent", model=Gemini(model=model_name, retry_options=RETRY_OPTIONS), description="Generates casting ideas for this film", instruction=""" PLOT_OUTLINE: { PLOT_OUTLINE? } INSTRUCTIONS: Generate ideas for casting for the characters described in PLOT_OUTLINE by suggesting actors who have received positive feedback from critics and/or fans when they have played similar roles. """, output_key="casting_report" ) preproduction_team = ParallelAgent( name="preproduction_team", sub_agents=[ box_office_researcher, casting_agent ] ) -
Update the existing film_concept_team agent's sub_agents list to include the
preproduction_teambetween the writers_room and file_writer:film_concept_team = SequentialAgent( name="film_concept_team", description="Write a film plot outline and save it as a text file.", sub_agents=[ writers_room, preproduction_team, file_writer ], ) -
Update the file_writer's instruction to:
""" INSTRUCTIONS: - Create a marketable, contemporary movie title suggestion for the movie described in the PLOT_OUTLINE. If a title has been suggested in PLOT_OUTLINE, you can use it, or replace it with a better one. - Use your 'write_file' tool to create a new txt file with the following arguments: - for a filename, use the movie title - Write to the 'movie_pitches' directory. - For the 'content' to write, include: - The PLOT_OUTLINE - The BOX_OFFICE_REPORT - The CASTING_REPORT PLOT_OUTLINE: { PLOT_OUTLINE? } BOX_OFFICE_REPORT: { box_office_report? } CASTING_REPORT: { casting_report? } """ -
Save the file.
-
In the ADK Dev UI, click + New Session in the upper right.
-
Enter
helloto start the conversation. -
When prompted, enter a new character idea that you are interested in. Some ideas include:
that actress who invented the technology for wifian exciting chefkey players in the worlds fair exhibitions
-
When the agent has completed its writing and report-generation, inspect the file it produced in the adk_multiagent_systems/movie_pitches directory. If a part of the process fails, click + New session in the upper right and try again.
Custom workflow agents
When the pre-defined workflow agents of SequentialAgent, LoopAgent, and ParallelAgent are insufficient for your needs,
CustomAgent
provides the flexibility to implement new workflow logic. You can define patterns for flow control, conditional execution, or state management between sub-agents.
This is useful for complex workflows, stateful orchestrations, or integrating custom business logic into the framework's orchestration layer.
Creation of a CustomAgent is out of the scope of this lab, but it is good to know that it exists if you need it!
Congratulations!
In this lab, you've learned to create multiple agents and relate them to one another with parent to sub-agent relationships, add to the session state and read it in agent instructions, and use workflow agents to pass the conversation between agents directly.
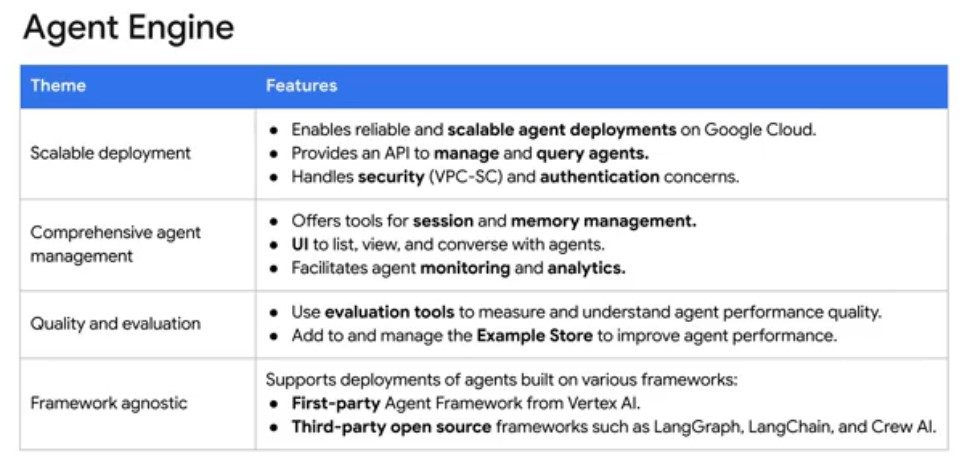
- The process involves developing, monitoring, evaluating and testing agents, registering and deploying them, and then querying them.
- Agent Engine aims to provide the shortest path to success by reducing friction from various areas like timeout requests, model choices, security, and CICD.
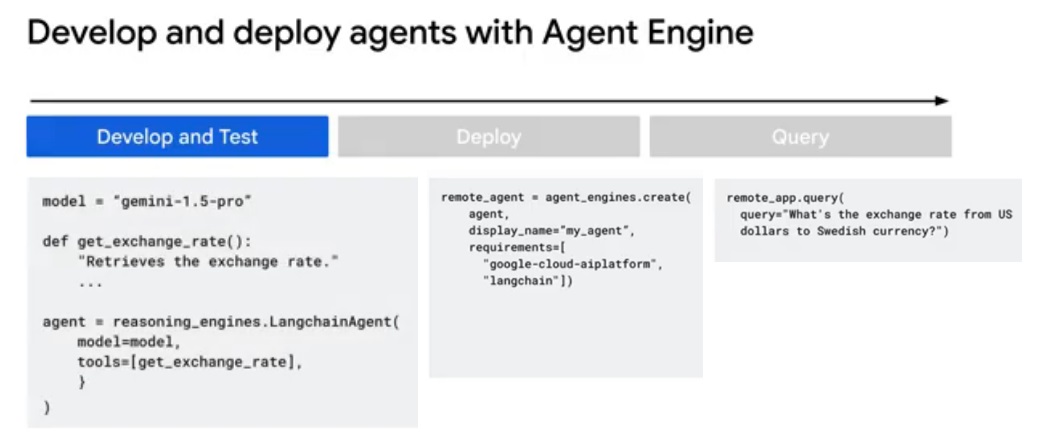
- In this lab, you will learn to deploy ADK agents to Agent Engine for a scalable, fully managed environment for your agentic workflows. This allows you to focus on the agents' logic while infrastructure is allocated and scaled for you.
- In this lab, you will learn:
a) The benefits of deploying agents to Agent Engine
b) How to grant required roles to the Reasoning Engine Service Agent
c) How to deploy an agent to Agent Engine using the ADK command line interface
d) How to query an agent deployed to Agent Engine
e) How to monitor your deployed agents
f) How to delete agents
Lab Steps copied over here:
Overview
In this lab, you will learn to deploy ADK agents to Agent Engine for a scalable, fully managed environment for your agentic workflows.
This allows you to focus on the agents' logic while infrastructure is allocated and scaled for you.
Objective
In this lab you will learn:
- The benefits of deploying agents to Agent Engine
- How to grant required roles to the Reasoning Engine Service Agent
- How to deploy an agent to Agent Engine using the ADK command line interface
- How to query an agent deployed to Agent Engine
- How to monitor your deployed agents
- How to delete agents
Agent Engine
Vertex AI Agent Engine (formerly known as LangChain on Vertex AI or Vertex AI Reasoning Engine) is a fully managed Google Cloud service enabling developers to deploy, manage, and scale AI agents in production.
You can learn more about its benefits in the Vertex AI Agent Engine documentation.
Task 1. Install ADK and set up your environment
Enable Vertex AI recommended APIs
- In this lab environment, the Vertex AI API has been enabled for you. If you were to follow these steps in your own project, you could enable it by navigating to Vertex AI and following the prompt to enable it.
Prepare a Cloud Shell Editor tab
- With your Google Cloud console window selected, open Cloud Shell by pressing the G key and then the S key on your keyboard. Alternatively, you can click the Activate Cloud Shell button ( ) in the upper right of the Cloud console.
- Click Continue.
- When prompted to authorize Cloud Shell, click Authorize.
- In the upper right corner of the Cloud Shell Terminal panel, click the Open in new window button .
- Click the Open Editor pencil icon ( ) at the top of the pane to view files.
- At the top of the left-hand navigation menu, click the Explorer icon ( ) to open your file explorer.
- Click the Open Folder button.
- In the Open Folder dialog that opens, click OK to select your Qwiklab student account's home folder.
- Close any additional tutorial or Gemini panels that appear on the right side of the screen to save more of your window for your code editor.
- Throughout the rest of this lab, you can work in this window as your IDE with the Cloud Shell Editor and Cloud Shell Terminal.
Download and install ADK and code samples for this lab
-
Paste the following commands into the Cloud Shell Terminal to copy a file from a Cloud Storage bucket, and unzip it, creating a project directory with code for this lab:
gcloud storage cp -r gs://YOUR_GCP_PROJECT_ID-bucket/adk_to_agent_engine . -
Update your
PATHenvironment variable and install ADK by running the following commands in the Cloud Shell Terminal.export PATH=$PATH:"/home/${USER}/.local/bin" python3 -m pip install -r adk_to_agent_engine/requirements.txt -
Run the following commands to create a .env file in the adk_to_agent_engine directory. (Note: To view a hidden file beginning with a period, you can use the Cloud Shell Editor menus to enable View > Toggle Hidden Files):
cd ~/adk_to_agent_engine cat << EOF > .env GOOGLE_GENAI_USE_VERTEXAI=TRUE GOOGLE_CLOUD_PROJECT=YOUR_GCP_PROJECT_ID GOOGLE_CLOUD_LOCATION=us-central1 MODEL=gemini_flash_model_id EOF -
Copy the .env file to the agent directory to provide your agent necessary authentication configurations once it is deployed:
cp .env transcript_summarization_agent/.env
Task 2. Deploy to Agent Engine using the command line deploy method
ADK's command line interface provides shortcuts to deploy agents to Agent Engine, Cloud Run, and Google Kubernetes Engine (GKE). You can use the following base commands to deploy to each of these services:
-
adk deploy agent_engine(with its command line args described under the@deploy.command("agent_engine")decorator) -
adk deploy cloud_run(with its command line args described under the@deploy.command("cloud_run")decorator) -
adk deploy gke(with its command line args described under the@deploy.command("gke")decorator)
The adk deploy agent_engine command wraps your agent in a reasoning_engines.AdkApp class and deploys this app to Agent Engine's managed runtime, ready to receive agentic queries.
When an AdkApp is deployed to Agent Engine, it automatically uses a VertexAiSessionService for persistent,
managed session state. This provides multi-turn conversational memory without any additional configuration. For local testing, the application defaults to a
temporary, InMemorySessionService.
To deploy an Agent Engine app using adk deploy agent_engine, complete the following steps:
-
In the
adk_to_agent_engine/transcript_summarization_agentdirectory, click on the agent.py file to review the instructions of this simple summarization agent. -
To deploy an agent, you must provide its requirements. In Cloud Shell Editor, right-click on the transcript_summarization_agent directory. (You may need to click Allow to enable the right-click menu.)
-
Select New File...
-
Name the file like a standard Python requirements file: requirements.txt
-
Paste the following into the file:
google-cloud-aiplatform[agent_engines,adk]>=1.112 -
Save the file.
-
In the Cloud Shell Terminal, run the deploy command:
adk deploy agent_engine transcript_summarization_agent \
--display_name "Transcript Summarizer" \
--region us-central1 \
--staging_bucket gs://YOUR_GCP_PROJECT_ID-bucket
You can follow the status from the log file that will be linked from the command's output. During deployment, the following steps are occurring:
- A bundle of artifacts is generated locally, comprising:
-
*.pkl: a pickle file corresponding to local_agent. -
requirements.txt: this file from the agent folder defining package requirements. -
dependencies.tar.gz: a tar file containing any extra packages.
-
- The bundle is uploaded to Cloud Storage (using a defined directory if specified) for staging the artifacts.
- The Cloud Storage URIs for the respective artifacts are specified in the PackageSpec.
- The Vertex AI Agent Engine service receives the request and builds containers and spins up HTTP servers on the backend.
Note: Deployment should take about 10 minutes, but you can continue with this lab while it deploys.
Quiz While Your Agent is Deploying
Each of the
adk deploy ...commands requires certain arguments to be set. For the most up-to-date arguments, click the linked commands in the list at the top of this task and look for the arguments marked as "Required".Some required arguments, like
--projectand--regionfrom theadk deploy agent_enginedeployment can load their values from the agent's.envfile if present.Answer the following questions based on the arguments for
adk deploy agent_engine:- The `--agent_engine_id` argument allows you to update an existing Agent Engine instance.
- The `--trace_to_cloud` argument has a default value of True.
- Which of the following is true about the `--adk_app` argument?
- Is required.
- Defaults to use your agent.py file.
- Creates app files for you to edit.
- check Accepts a filename to define an ADK app.
Highlights from Expected Output:
Copying agent source code... Copying agent source code complete. Initializing Vertex AI... [...] Creating AgentEngine Create AgentEngine backing LRO: projects/430282503153/locations/us-central1/reasoningEngines/2902138951282196480/operations/2777364189918789632 View progress and logs at https://console.cloud.google.com/logs/query?project=qwiklabs-gcp-04-f71a2270bd79 AgentEngine created. Resource name: projects/430282503153/locations/us-central1/reasoningEngines/2902138951282196480 To use this AgentEngine in another session: agent_engine = vertexai.agent_engines.get('projects/430282503153/locations/us-central1/reasoningEngines/2902138951282196480') Cleaning up the temp folder: /tmp/agent_engine_deploy_src/20250813_175223 - A bundle of artifacts is generated locally, comprising:
Task 3. Get and query an agent deployed to Agent Engine
To query the agent, you must first grant it the authorization to call models via Vertex AI.
-
To see the service agent and its assigned role, navigate to IAM in the console.
-
Click the checkbox to Include Google-provided role grants.
-
Find the AI Platform Reasoning Engine Service Agent (
service-PROJECT_NUMBER@gcp-sa-aiplatform-re.iam.gserviceaccount.com), and click the edit pencil icon in this service agent's row. -
Click + Add another role.
-
In the Select a role field, enter Vertex AI User. If you deploy an agent that uses tools to access other data, you would grant access to those systems to this service agent as well.
-
Save your changes.
-
Back in the Cloud Shell Editor, within the adk_to_agent_engine directory, open the file query_agent_engine.py.
-
Review the code and comments to notice what it is doing.
-
Review the transcript passed to the agent, so that you can evaluate if it's generating an adequate summary.
-
In the Cloud Shell Terminal, run the file from the adk_to_agent_engine directory with:
cd ~/adk_to_agent_engine/transcript_summarization_agent
python3 query_agent_engine.py
Example output (yours results may be a little different):
[remote response] The user wants to buy a boat, and after being asked about the size, inquires how much boat $50,000 will purchase. The Virtual Agent responds that $50,000 will get a "very nice boat," to which the user agrees to proceed.
Task 4. View and delete agents deployed to Agent Engine
-
When your agent has completed its deployment, return to a browser tab showing the Cloud Console and navigate to Agent Engine by searching for it and selecting it at the top of the Console.
-
In the Region dropdown, make sure the Region us-central1 is selected.
-
You will see your deployed agent's display name. Click on it to enter its monitoring dashboard.
-
Notice tabs for Runtime Metrics, Traces, Sessions, which can give you insights into how your agent is being used.
-
Notice the Playground which will let you chat with your deployed agent.
-
When you are ready to delete your agent, select Service Configuration at the top of the Agent Engine console, and then the Deployment details tab.
-
Back in your browser tab running the Cloud Shell Terminal, paste the following command, but don't run it yet:
cd ~/adk_to_agent_engine python3 agent_engine_utils.py delete REPLACE_WITH_AE_ID -
From the Agent Engine Deployment details panel, copy the Resource name field, which will have a format like:
projects/qwiklabs-gcp-02-76ce2eed15a5/locations/us-central1/reasoningEngines/1467742469964693504. -
Return to the Cloud Shell Terminal and replace the end of the command
REPLACE_WITH_AE_IDwith the resource name you've copied. -
Press Return to run the deletion command.
Example Output:
Deleting AgentEngine resource: projects/1029886909158/locations/us-central1/reasoningEngines/1456078850617245696 Delete AgentEngine backing LRO: projects/1029886909158/locations/us-central1/operations/2884525977596067840 AgentEngine resource deleted: projects/1029886909158/locations/us-central1/reasoningEngines/1456078850617245696 -
In the Cloud Console, return to the Agent Engine dashboard to see that the agent has been deleted.
-
To view the simple Python SDK code to list and delete agents, view the contents of the file adk_to_agent_engine/agent_engine_utils.py.
Congratulations!
In this lab, you’ve learned:
- The benefits of deploying agents to Agent Engine
- How to grant required roles to the Reasoning Engine Service Agent
- How to deploy an agent to Agent Engine using the ADK command line interface
- How to query an agent deployed to Agent Engine
- How to monitor your deployed agents
- How to delete agents
- In this lab, you explore Model Context Protocol (MCP), an open standard that enables seamless integration between external services, data sources, tools, and applications. You learn how to integrate MCP into your Agent Development Kit (ADK) agents, using tools provided by existing MCP servers to enhance your ADK workflows. Additionally, you discover how to expose ADK tools like load_web_page through a custom-built MCP server, enabling broader integration with MCP clients.
- Objectives:
a) Use an ADK agent as an MCP client to interact with tools from existing MCP servers.
b) Configure and deploy your own MCP server to expose ADK tools to other clients.
c) Connect ADK agents with external tools through standardized MCP communication.
d) Enable seamless interaction between LLMs and tools using MCP.
Overview
In this lab, you explore Model Context Protocol (MCP), an open standard that enables seamless
integration between external services, data sources, tools, and applications. You learn how to integrate MCP into your Agent Development Kit (ADK) agents, using
tools provided by existing MCP servers to enhance your ADK workflows. Additionally, you discover how to expose ADK tools like load_web_page through a
custom-built MCP server, enabling broader integration with MCP clients.
What is Model Context Protocol (MCP)?
Model Context Protocol (MCP) is an open standard designed to standardize how Large Language Models (LLMs) like Gemini and Claude communicate with external applications, data sources, and tools. Think of it as a universal connection mechanism that simplifies how LLMs obtain context, execute actions, and interact with various systems.
MCP follows a client-server architecture, defining how data (resources), interactive templates (prompts), and actionable functions (tools) are exposed by an MCP server and consumed by an MCP client (which could be an LLM host application or an AI agent).
This lab covers two primary integration patterns:
- Using existing MCP Servers within ADK: An ADK agent acts as an MCP client, leveraging tools provided by external MCP servers.
- Exposing ADK Tools via an MCP Server: Building an MCP server that wraps ADK tools, making them accessible to any MCP client.
Objectives
In this lab, you learn how to perform the following tasks:
- Use an ADK agent as an MCP client to interact with tools from existing MCP servers.
- Configure and deploy your own MCP server to expose ADK tools to other clients.
- Connect ADK agents with external tools through standardized MCP communication.
- Enable seamless interaction between LLMs and tools using MCP.
Task 1. Install the ADK and set up your environment
In this lab environment, the Agent Platform API, Routes API, and Directions API have been enabled for you.
Prepare a Cloud Shell Editor tab
- From the Google Cloud console, click the Activate Cloud Shell button ( ) in the upper right of the Cloud console.
- Click Continue.
- When prompted to authorize Cloud Shell, click Authorize.
- In the upper-right corner of the Cloud Shell terminal panel, click the Open in new window button ( ).
- Click the Open Editor icon ( ) at the top of the pane to view files.
- At the top of the left-hand navigation menu, click the Explorer icon ( ) to open your file explorer.
- Click the Open Folder button.
- In the Open Folder dialog that opens, click OK to select your student account's home folder.
- Close any additional tutorial or Gemini panels that appear on the right side of the screen to save more of your window for your code editor.
- Throughout the rest of this lab, you work in this window as your IDE with the Cloud Shell Editor and Cloud Shell terminal.
Download and install the ADK and code samples for this lab
In this section, you run the commands that follow in the Cloud Shell terminal.
-
Run the following command in the Cloud Shell terminal to copy the project directory from Cloud Storage:
gcloud storage cp -r gs://qwiklabs-gcp-03-edc32c9f52f1-bucket/* . -
Run the following commands to install the Agent Development Kit (ADK) and other dependencies required to run the sample applications:
export PATH=$PATH:"/home/${USER}/.local/bin"
python3 -m pip install google-adk==1.22.1 -r adk_mcp_tools/requirements.txt
Task 2. Use the Google Maps MCP server with ADK agents (ADK as an MCP client) in the ADK Dev UI
This section demonstrates how to integrate tools from an external Google Maps MCP server into your ADK agents. This is the most common integration pattern when
your ADK agent needs to use capabilities provided by an existing service that exposes an MCP interface. You will see how the MCPToolset class can be
directly added to your agent's tools list, enabling seamless connection to an MCP server, discovery of its tools, and making them available for your
agent to use. These examples primarily focus on interactions within the adk web development environment.
MCPToolset
The MCPToolset class is ADK's primary mechanism for integrating tools from an MCP server. When you include an MCPToolset instance in your
agent's tools list, it automatically handles the interaction with the specified MCP server. Here's how it works:
-
Connection Management: On initialization,
MCPToolsetestablishes and manages the connection to the MCP server. This can be a local server process (usingStdioServerParametersfor communication over standard input/output) or a remote server (usingSseServerParamsfor Server-Sent Events). The toolset also handles the graceful shutdown of this connection when the agent or application terminates. -
Tool Discovery & Adaptation: Once connected,
MCPToolsetqueries the MCP server for its available tools (via thelist_toolsMCP method). It then converts the schemas of these discovered MCP tools into ADK-compatibleBaseToolinstances. -
Exposure to Agent: These adapted tools are then made available to your
LlmAgentas if they were native ADK tools. -
Proxying Tool Calls: When your
LlmAgentdecides to use one of these tools,MCPToolsettransparently proxies the call (using thecall_toolMCP method) to the MCP server, sends the necessary arguments, and returns the server's response back to the agent. -
Filtering (Optional): You can use the
tool_filterparameter when creating an MCPToolset to select a specific subset of tools from the MCP server, rather than exposing all of them to your agent.
Get an API key and enable the APIs
The Google Maps MCP server requires an API key to communicate with Google Maps services. In this step, you generate a new API key named GOOGLE_MAPS_API_KEY and restrict it to the Directions and Routes APIs for security.
-
Go to the Google Cloud console browser tab (not your Cloud Shell Editor).
-
You can close the Cloud Shell terminal pane in this browser tab for more console area.
-
Search for Credentials in the search bar at the top of the page. Select it from the results.
-
On the Credentials page, click Create credentials at the top of the page, then select API key.
-
For Name, type GOOGLE_MAPS_API_KEY
-
For APIs that can be accessed using this key, select the following APIs:
- Directions API
- Routes API
-
Click Create.
The API key created dialog displays your newly created API key. Be sure to copy and save this key locally for use later in the lab.
-
Click Close on the dialog box.
Show Image
Define your Agent with an MCPToolset for Google Maps
Now you will configure your agent to use the Google Maps tools. By adding the MCPToolset, you enable the agent to dynamically discover and call the
Maps APIs when needed.
-
Paste the following command into a plain text document on your computer, then update the
YOUR_ACTUAL_API_KEYvalue with the Google Maps API key you generated and saved in a previous step:cd ~/adk_mcp_tools
cat << EOF > google_maps_mcp_agent/.env
GOOGLE_GENAI_USE_VERTEXAI=TRUE
GOOGLE_CLOUD_PROJECT=qwiklabs-gcp-03-edc32c9f52f1
GOOGLE_CLOUD_LOCATION=global
GOOGLE_MAPS_API_KEY="YOUR_ACTUAL_API_KEY"
MODEL=gemini-3.5-flash
EOF
-
Copy and paste the updated command into the Cloud Shell terminal and run it to write a .env file, which provides authentication details for this agent directory.
-
Copy the .env file to the other agent directory for later use in this lab by running the following command:
cp google_maps_mcp_agent/.env adk_mcp_server/.env -
In the Cloud Shell Editor's file explorer pane, find the adk_mcp_tools folder. Click it to toggle it open.
-
Navigate to the directory adk_mcp_tools/google_maps_mcp_agent.
-
Open
agent.pyand add the following code after the comment## Add the MCPToolset(on a new line after line 53) to configure the agent's connection to the Google Maps MCP server:tools=[ MCPToolset( connection_params=StdioConnectionParams( server_params=StdioServerParameters( command='npx', args=[ "-y", "@modelcontextprotocol/server-google-maps", ], env={ "GOOGLE_MAPS_API_KEY": google_maps_api_key } ), timeout=15, ), ) ], -
Save the file.
-
From the adk_mcp_tools project directory, launch the Agent Development Kit Dev UI with the following command:
adk web --allow_origins "regex:https://.*.cloudshell.dev" --otel_to_cloud --reload_agentsOutput:
-
To view the web interface in a new tab, click the http://127.0.0.1:8000 link in the terminal output.
-
A new browser tab opens with the ADK Dev UI. From the Select an agent drop-down on the left, select the google_maps_mcp_agent.
-
Start a conversation with the agent and run the following prompts: Get directions from GooglePlex to SFO.
What's the route from Paris, France to Berlin, Germany?Output:
Show Image
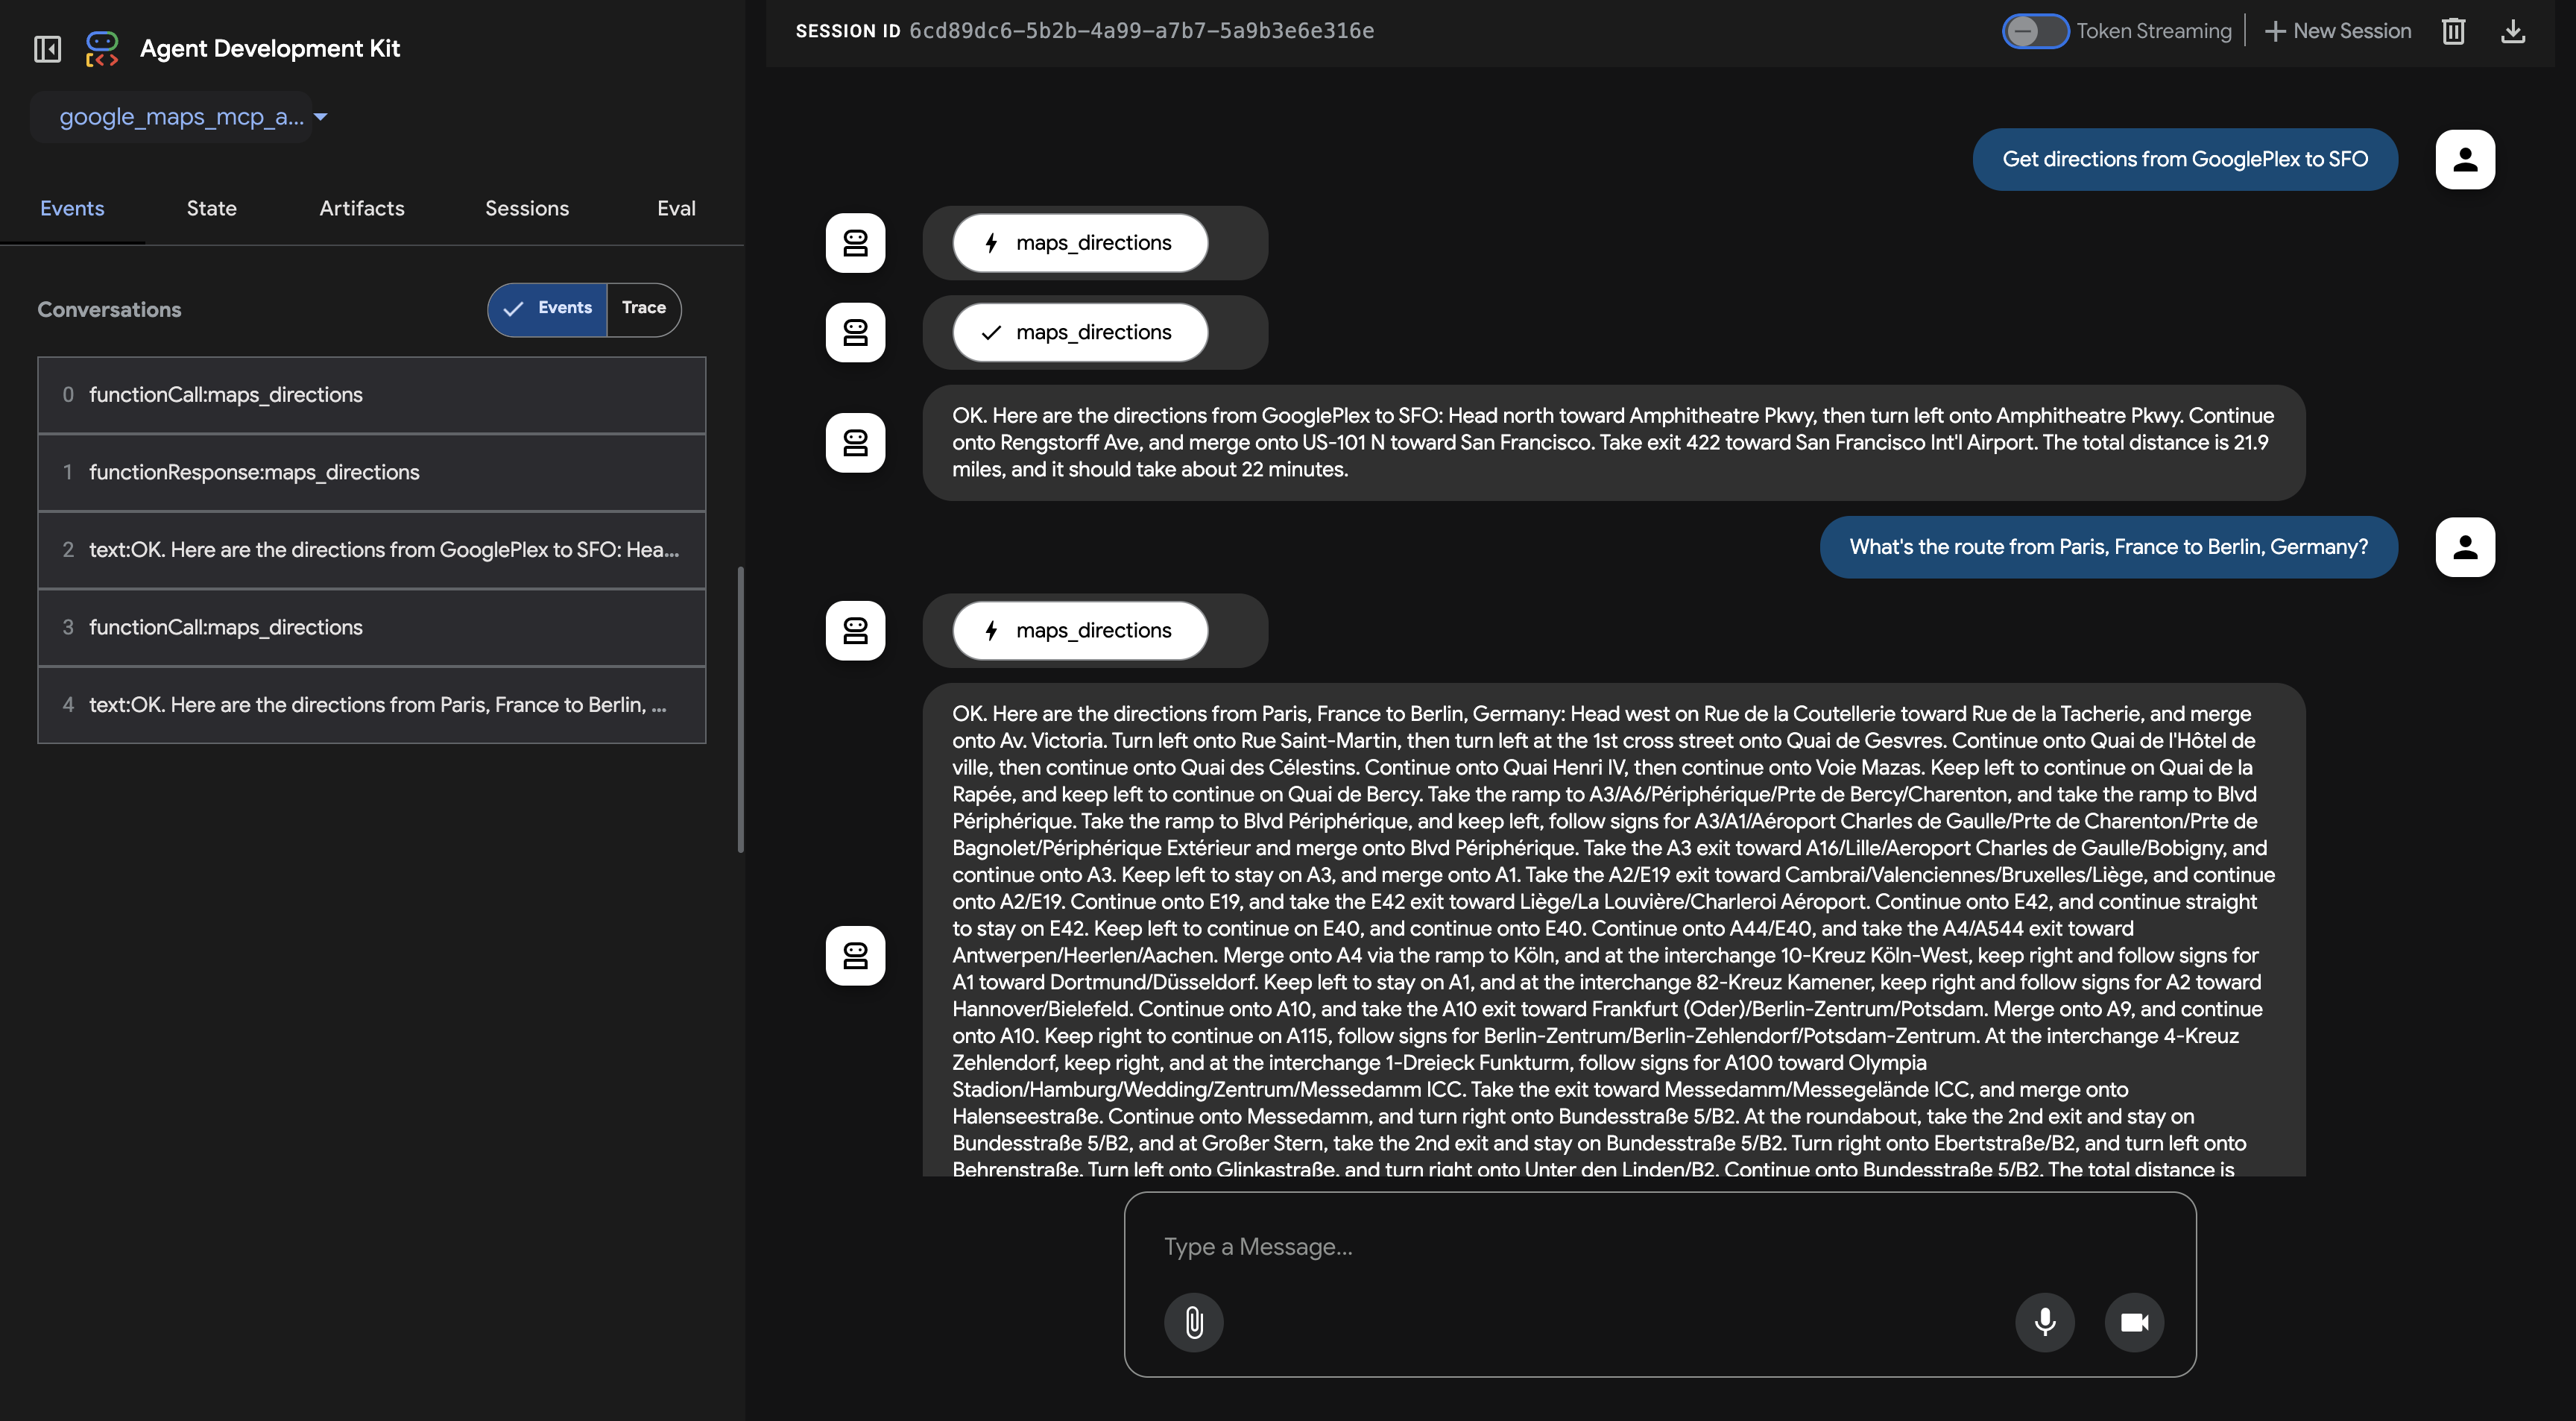
-
Click the agent icon next to the agent's chat bubble with a lightning bolt, which indicates a function call. This opens up the Event inspector for this event.
Show Image

Notice that the agent graph indicates several different tools, identified by the wrench emoji (🔧). Even though you only imported one
MCPToolset, that toolset came with the different tools you see listed here, such asmaps_place_detailsandmaps_directions.Show Image
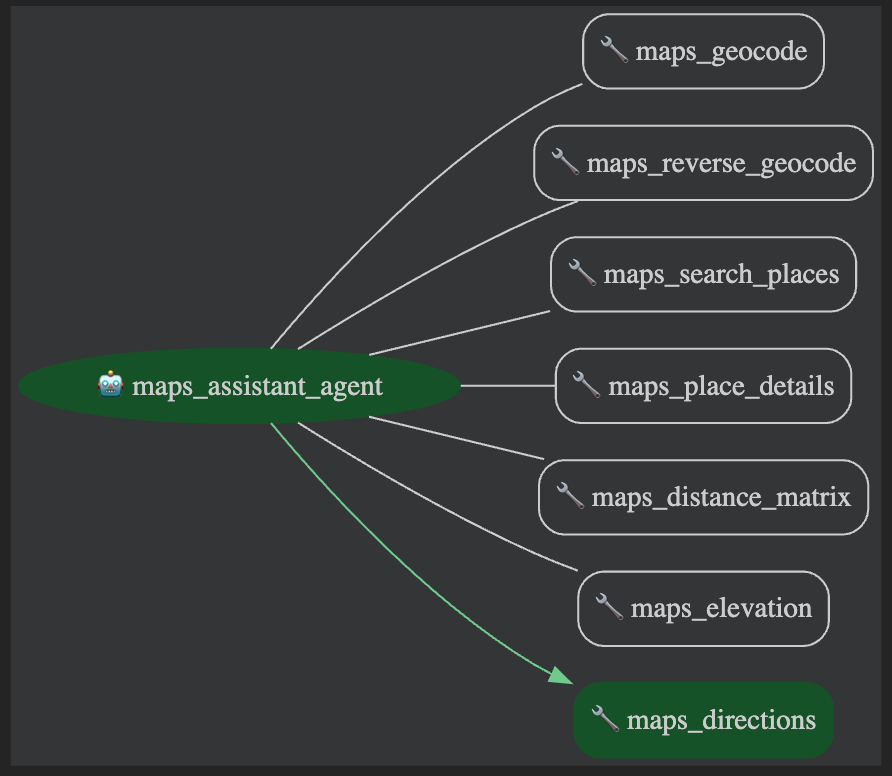
On the Event tab, you can see the structure of the request. You can use the arrows at the top of the Event inspector to browse the agent's thoughts, function calls, and responses.
-
When you are finished asking questions of this agent, close the Dev UI browser tab.
-
Go back to the Cloud Shell terminal panel and press CTRL+C to stop the server.
Task 3. Build an MCP server with ADK tools (MCP server exposing ADK)
In this section, you learn how to expose the ADK load_web_page tool through a custom-built MCP server. This pattern allows you to wrap existing ADK
tools and make them accessible to any standard MCP client application.
Create the MCP Server script and implement server logic
-
Return to your Cloud Shell Editor and select the adk_mcp_tools/adk_mcp_server directory.
-
Open the Python file named adk_server.py. This file contains the logic for your custom MCP server. Review the code to understand how it wraps the ADK tool and serves it.
Take some time to review that file, reading the comments to understand how the code wraps a tool and serves it as an MCP server. Notice how it allows MCP clients to list available tools as well as invoke the ADK tool asynchronously, handling requests and responses in an MCP-compliant format.
Test the custom MCP Server with an ADK Agent
-
Open
agent.pyin theadk_mcp_serverdirectory. -
In line 31, update the value of
PATH_TO_YOUR_MCP_SERVER_SCRIPTto the following path so the agent can connect to your custom server script:/home/student_02_f6e09d5c9c91/adk_mcp_tools/adk_mcp_server/adk_server.py -
Next, add the following code in line 55, i.e. after where it says
## Add the MCPToolset below:in theagent.pyfile, to add the MCPToolset to your agent. An ADK agent acts as a client to the MCP server. This ADK agent usesMCPToolsetto connect to youradk_server.pyscript.tools=[ MCPToolset( connection_params=StdioConnectionParams( server_params=StdioServerParameters( command="python3", # Command to run your MCP server script args=[PATH_TO_YOUR_MCP_SERVER_SCRIPT], # Argument is the path to the script ), timeout=15, ), tool_filter=['load_web_page'] # Optional: ensure only specific tools are loaded ) ], -
Save the file.
-
To run the MCP server, start the
adk_server.pyscript by running the following command in the Cloud Shell terminal:python3 ~/adk_mcp_tools/adk_mcp_server/adk_server.pyOutput:
Show Image

-
Open a new Cloud Shell terminal tab by clicking the button at the top of the Cloud Shell terminal window.
-
In the Cloud Shell terminal, from the adk_mcp_tools project directory, launch the Agent Development Kit Dev UI with the following command:
export PATH=$PATH:"/home/${USER}/.local/bin"
cd ~/adk_mcp_tools
adk web --allow_origins "regex:https://.*.cloudshell.dev" --otel_to_cloud --reload_agentsNote: `PATH` has been added to this command to reset it, as the new Cloud Shell terminal may give you an error if you ran the rest of the command without it. Typically this would be an `adk web` not found error. -
To view the web interface in a new tab, click the http://127.0.0.1:8000 link in the terminal output.
-
From the Select an agent drop-down on the left, select the adk_mcp_server.
-
Prompt the agent with the following: Load the content from http://example.com.
Output:
Show Image
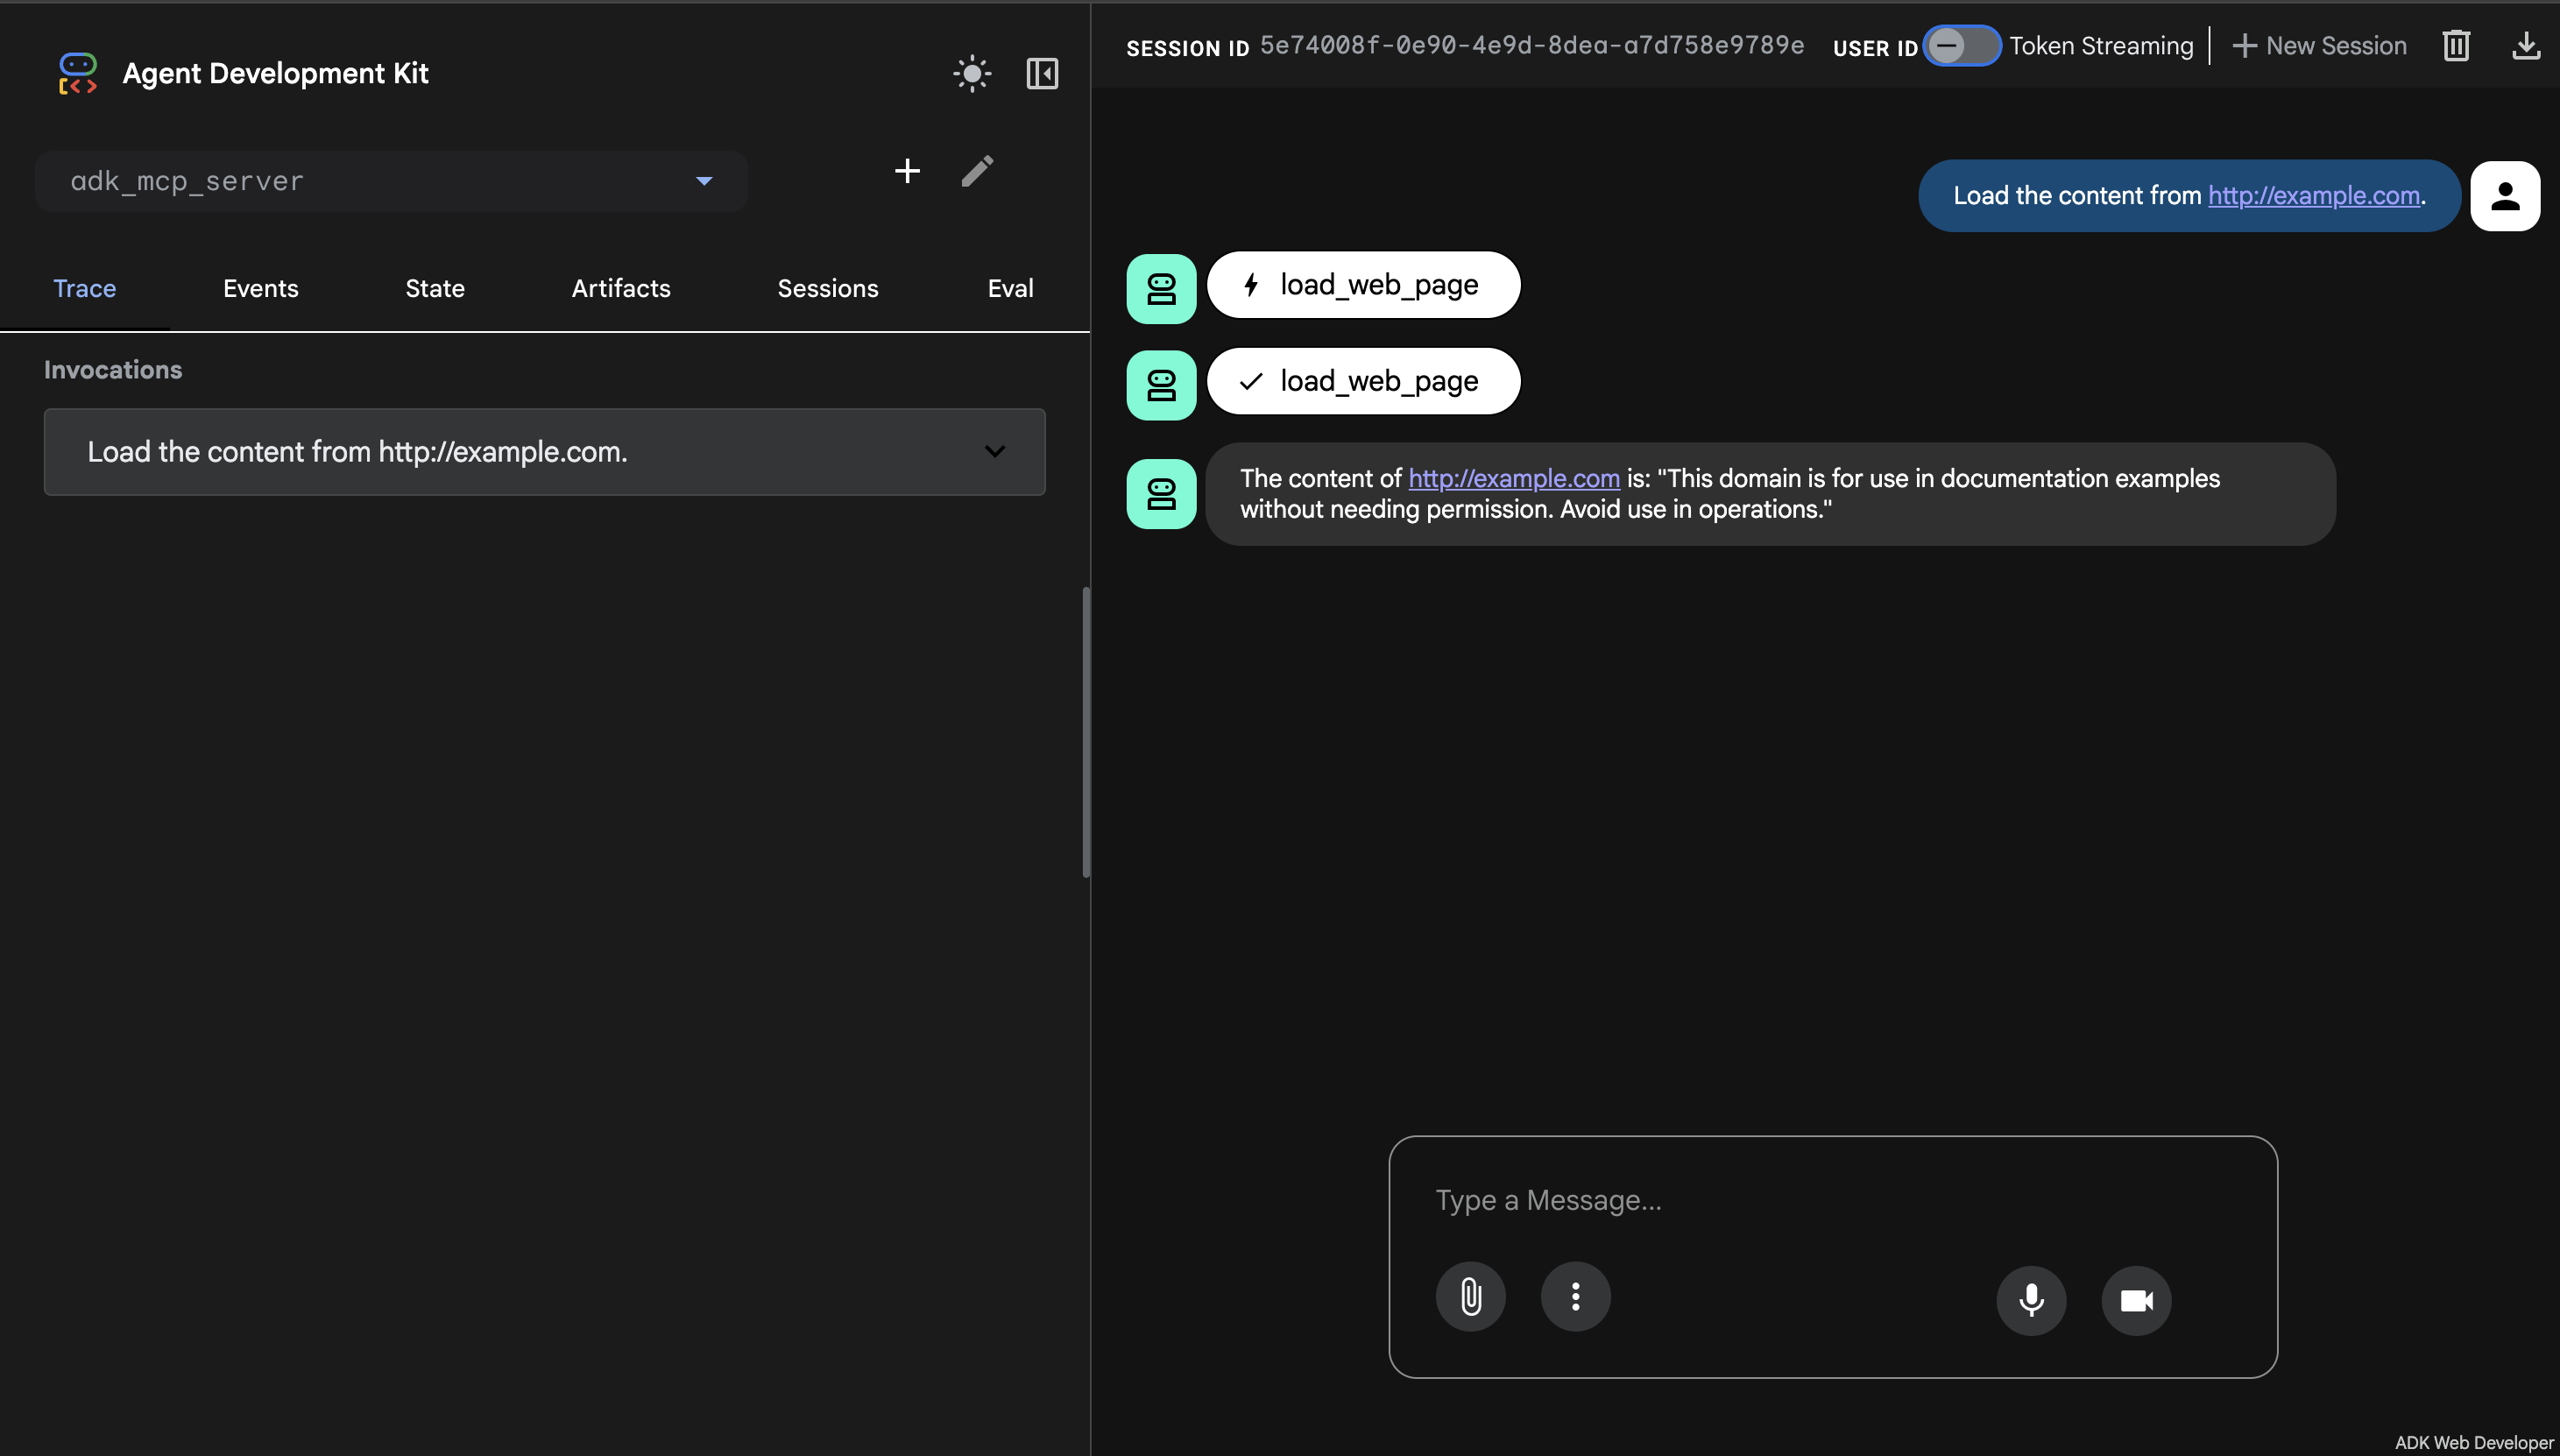
What happens here:
- The ADK agent (
web_reader_mcp_client_agent) uses theMCPToolsetto connect to youradk_server.py. - The MCP server receives the
call_toolrequest, executes the ADKload_web_pagetool, and returns the result. - The ADK agent then relays this information.
You should see logs from both the ADK Web UI (and its terminal) and from your
adk_server.pyterminal in the Cloud Shell terminal tab where it is running.
This demonstrates that ADK tools can be encapsulated within an MCP server, making them accessible to a broad range of MCP-compliant clients, including ADK agents.
- The ADK agent (
Congratulations!
In this lab, you learned how to integrate external Model Context Protocol (MCP) tools into your Agent Development Kit (ADK) agents using the MCPToolset class. You
discovered how to connect to an MCP server, use its tools within your agent, and expose ADK tools like load_web_page through a custom MCP server. These
skills enable you to extend your ADK agents with powerful, external services, enhancing your web development workflows.
- In this lab, you learn how to perform the following tasks:
a) Set up your environment and install the Agent Development Kit (ADK).
b) Deploy an ADK agent as an A2A Server.
c) Prepare a JSON Agent Card to describe an A2A agent's capabilities.
d) Enable another ADK agent to read the Agent Card of your deployed A2A agent and use it as a sub-agent.
Overview
The Agent2Agent (A2A) protocol addresses a critical challenge in the AI landscape: enabling generative AI agents, built on diverse frameworks by different companies running on separate servers, to communicate and collaborate effectively – as agents, not just as tools. A2A aims to provide a common language for agents, fostering a more interconnected, powerful, and innovative AI ecosystem.
A2A is built around a few core concepts that make it powerful and flexible:
- Standardized Communication: JSON-RPC 2.0 over HTTP(S).
- Agent Discovery: Agent Cards detail an agent's capabilities and connection info, so agents can discover each other and learn about each other's capabilities
- Rich Data Exchange: Handles text, files, and structured JSON data.
- Flexible Interaction: Supports synchronous request/response, streaming (SSE), and asynchronous push notifications.
- Enterprise-Readiness: Designed with security, authentication, and observability in mind.
Objectives
In this lab, you learn how to perform the following tasks:
- Set up your environment and install the Agent Development Kit (ADK).
- Deploy an ADK agent as an A2A Server.
- Prepare a JSON Agent Card to describe an A2A agent's capabilities.
- Enable another ADK agent to read the Agent Card of your deployed A2A agent and use it as a sub-agent.
Task 1. Install ADK and set up your environment
In this lab environment, the Agent Platform API and Cloud Run API have been enabled for you. If you were to follow these steps in your own project, you would enable them by navigating to Agent Platform and following the prompt to enable it.
Prepare a Cloud Shell Editor tab
- With your Google Cloud console window selected, press G,S to open Cloud Shell. Alternatively, you can click the Activate Cloud Shell button ( ) in the upper right of the Cloud console.
- Click Continue.
- When prompted to authorize Cloud Shell, click Authorize.
- In the upper-right corner of the Cloud Shell terminal panel, click the Open in new window button ( ).
- Click the Open Editor pencil icon ( ) at the top of the pane to view files.
- At the top of the left-hand navigation menu, click the Explorer icon ( ) to open your file explorer.
- Click the Open Folder button.
- In the Open Folder dialog that opens, click OK to select your student account's home folder.
- Close any additional tutorial or Gemini panels that appear on the right side of the screen to save more of your window for your code editor.
- Throughout the rest of this lab, you work in this window as your IDE with the Cloud Shell Editor and Cloud Shell terminal.
Download and install the ADK and code samples for this lab
-
Download code for this lab and install the Agent Development Kit (ADK) and other requirements by running the following code in the Cloud Shell terminal:
gcloud storage cp -r gs://qwiklabs-gcp-03-8ddb51b31848-bucket/* .
export PATH=$PATH:"/home/${USER}/.local/bin"
python3 -m pip install --upgrade google-adk[a2a]==1.31.0 google-genai
Task 2. Explore the ADK agent you plan to make available remotely
For the purposes of this lab, imagine you work for a stadium maintenance company, Cymbal Stadiums. As part of a recent project, you developed an image generation agent that can create illustrations according to your brand guidelines. Now, several different teams in your organization want to use it too.
If you were to copy the code for use as a sub-agent by many agents, it would be very difficult to maintain and improve all of these copies.
Instead, you can deploy the agent once as an agent wrapped with an A2A server, and the other teams' agents can incorporate it by querying it remotely.
-
In the Cloud Shell Editor's file explorer pane, navigate to the adk_and_a2a/illustration_agent directory. This directory contains the ADK agent you plan to make available remotely. Click the directory to toggle it open.
-
Open the
agent.pyfile in this directory and scroll to the section labeled# Tools. -
Notice the
generate_image()function, which is used as a tool by this agent. It receives a prompt and performs a two-step process. First, it uses the Google Gen AI SDK to callgenerate_content(), which returns the raw image data directly in the response. Second, the function uses the Cloud Storage library to upload these image bytes to a Google Cloud Storage bucket. Finally, the tool returns a URL for the newly created image file. -
Notice that the
instructionprovided to theroot_agentprovides specific instructions to the agent to use image-generation prompts that respect the company's brand guidelines. For example, it specifies:- a specific illustration style: (Corporate Memphis)
- a color palette (purples and greens on sunset gradients)
- examples of stadium/sports and maintenance imagery because it is a stadium maintenance company
-
To see it in action, you first need to write a .env file to set environment variables needed by ADK agents. Run the following in the Cloud Shell terminal to write this file in this directory.
cd ~/adk_and_a2a
cat << EOF > illustration_agent/.env
GOOGLE_GENAI_USE_VERTEXAI=TRUE
GOOGLE_CLOUD_PROJECT=qwiklabs-gcp-03-8ddb51b31848
GOOGLE_CLOUD_LOCATION=global
MODEL=gemini-3.5-flash
IMAGE_MODEL=gemini-3.1-flash-image
EOF
-
Run the following to copy the .env to another agent directory you are using in this lab:
cp illustration_agent/.env slide_content_agent/.env -
To enable the agent to create a signed URL for its images, you must impersonate a dedicated service account. Run the following command to configure application default credentials with impersonation:
gcloud auth application-default login --impersonate-service-account=illustration-agent-sa@qwiklabs-gcp-03-8ddb51b31848.iam.gserviceaccount.com -
You will be asked in Cloud Shell Terminal to confirm that you would like to authenticate with a personal account. Type Y (to indicate 'Yes') and press Enter.
-
Click the link provided and select your Qwiklabs student account to authenticate.
-
Once authenticated, you will be presented an authorization code. Use the Copy button to copy that code and return to the Cloud Shell Terminal.
-
Paste the copied code into the Cloud Shell Terminal and press Enter.
-
Now from the Cloud Shell terminal, launch the Agent Development Kit Dev UI with the following command:
adk web --allow_origins "regex:https://.*\.cloudshell\.dev" -
To view the web interface in a new tab, click the http://127.0.0.1:8000 link at the bottom of the terminal output.
-
A new browser tab opens with the ADK Dev UI.
-
In the ADK Dev UI tab, from the Select an app drop-down on the left, select the illustration_agent.
-
Prompt the agent with some text that could be used in a recruitment slide deck: By supporting each other, we get big things done!
-
After a minute or two, the agent responds with the prompt it generated and a preview of the image.
Example Output
Show Image

-
Notice that the prompt you provided to the agent didn't mention sports, stadiums, or maintenance work, but the agent took your text and the brand guidelines and combined them into a single prompt for the image generation model.
When you are finished exploring the base agent, close the browser tab.
-
Return to the Cloud Shell terminal and press CTRL+C to stop the server.
Task 3. Deploy the agent as an A2A Server
In this task, you take the steps to deploy this agent as a remote A2A agent. An A2A Agent identifies itself and its capabilities by serving an Agent Card.
-
Run the following to create an agent.json file:
cat << EOF > illustration_agent/agent.json { "name": "illustration_agent", "description": "An agent designed to generate branded illustrations for Cymbal Stadiums.", "defaultInputModes": ["text/plain"], "defaultOutputModes": ["application/json"], "skills": [ { "id": "illustrate_text", "name": "Illustrate Text", "description": "Generate an illustration to illustrate the meaning of provided text.", "tags": ["illustration", "image generation"] } ], "url": "https://illustration-agent-1007791943629.us-east4.run.app/a2a/illustration_agent", "capabilities": {}, "version": "1.0.0" } EOF -
Review the JSON in the agent.json file. Notice that it gives the agent a
nameanddescriptionand identifies someskills. It also indicates aurlwhere the agent itself can be called.The agent's
urlis constructed to be its Cloud Run service URL once you have deployed it following the instructions in this lab.While similar in name to
skills, the parametercapabilitieshere is reserved to indicate abilities like streaming. -
Run the following to create a requirements.txt file in the illustration_agent directory:
cat << EOF > illustration_agent/requirements.txt google-adk[a2a]==1.31.0 EOF -
In the following command, you use
adk deploy cloud_runwith the--a2aflag to deploy your agent to Cloud Run as an A2A server:adk deploy cloud_run \ --project qwiklabs-gcp-03-8ddb51b31848 \ --region us-east4 \ --service_name illustration-agent \ --a2a \ illustration_agent \ -- \ --service-account=illustration-agent-sa@qwiklabs-gcp-03-8ddb51b31848.iam.gserviceaccount.com \ --set-env-vars="GOOGLE_CLOUD_LOCATION=global" -
When prompted to allow unauthenticated responses, type Y, and then press ENTER.
While the agent deploys, review the following arguments passed to the command:
- The
--projectand--regiondefine the project and region in which your Cloud Run service will be deployed. - The
--service_namedefines the name for the Cloud Run service. - The
--a2aflag indicates it should be hosted as an A2A agent. This means that your agent will be wrapped by a class that bridges ADK and A2A agents, the A2aAgentExecutor. This class translates A2A Protocol's language of tasks and messages to an ADK Runner in its language of events. - The
--separator is used to pass flags directly to the underlyinggcloud run deploycommand. Any flags listed after--are ignored by the ADK tool and handled directly by the Google Cloud CLI. Here it is used to assign the dedicated service account and set theGOOGLE_CLOUD_LOCATIONenvironment variable on the initial deployment.
PERMISSION_DENIEDerror, try running the above command again.Expected output:
You should see steps relating to building a Dockerfile and deploying the container, then deploying the service, followed by:
Service [illustration-agent] revision [illustration-agent-00001-xpp] has been deployed and is serving 100 percent of traffic. Service URL: https://illustration-agent-1007791943629.us-east4.run.app - The
Task 4. Enable another ADK agent to call this agent remotely
In this task, you provide a second ADK agent the ability to identify your illustration agent's capabilities and call it remotely. This second agent is tasked with creating contents for slides. It must write a headline and a couple of sentences of body text, then transfer to the illustration agent to generate an image to illustrate that text.
-
In the Cloud Shell terminal, run the following command to copy the Agent Card JSON file to your adk_and_a2a directory and change its name to indicate that it represents the illustration_agent:
cp illustration_agent/agent.json illustration-agent-card.json -
In the Cloud Shell Editor's file explorer pane, navigate to the adk_and_a2a/slide_content_agent directory, and open the agent.py file.
Review this agent's
instructionto see that it takes a user's suggestion for a slide, uses that to write a headline & body text, and then requests that your A2A agent provides an illustration for the slide. -
Paste the following code under the
# Agentsheader (around line #16) to add the remote agent using the RemoteA2aAgent class from ADK:illustration_agent = RemoteA2aAgent( name="illustration_agent", description="Agent that generates illustrations.", agent_card=( "illustration-agent-card.json" ), ) -
Add the
illustration_agentas a sub-agent of theroot_agentby adding the following parameter under# Add the sub_agents parameter belowin the same file:sub_agents=[illustration_agent] -
Save the file.
-
Launch the UI from the Cloud Shell terminal with the following command:
cd ~/adk_and_a2a
adk web --allow_origins "regex:https://.*\.cloudshell\.dev"
-
Once again, click the http://127.0.0.1:8000 link in the terminal output to launch the ADK Dev UI.
-
In the ADK Dev UI browser tab, from the Select an app drop-down on the left, select the slide_content_agent.
-
Prompt the agent with an idea for a slide as follows: Create content for a slide about our excellent on-the-job training.
You should see the following output:
- A headline and body text written by the slide_content_agent itself.
- A call to transfer_to_agent, indicating a transfer to the illustration_agent.
- The response from the illustration_agent with the new image.
Expected output:
Show Image
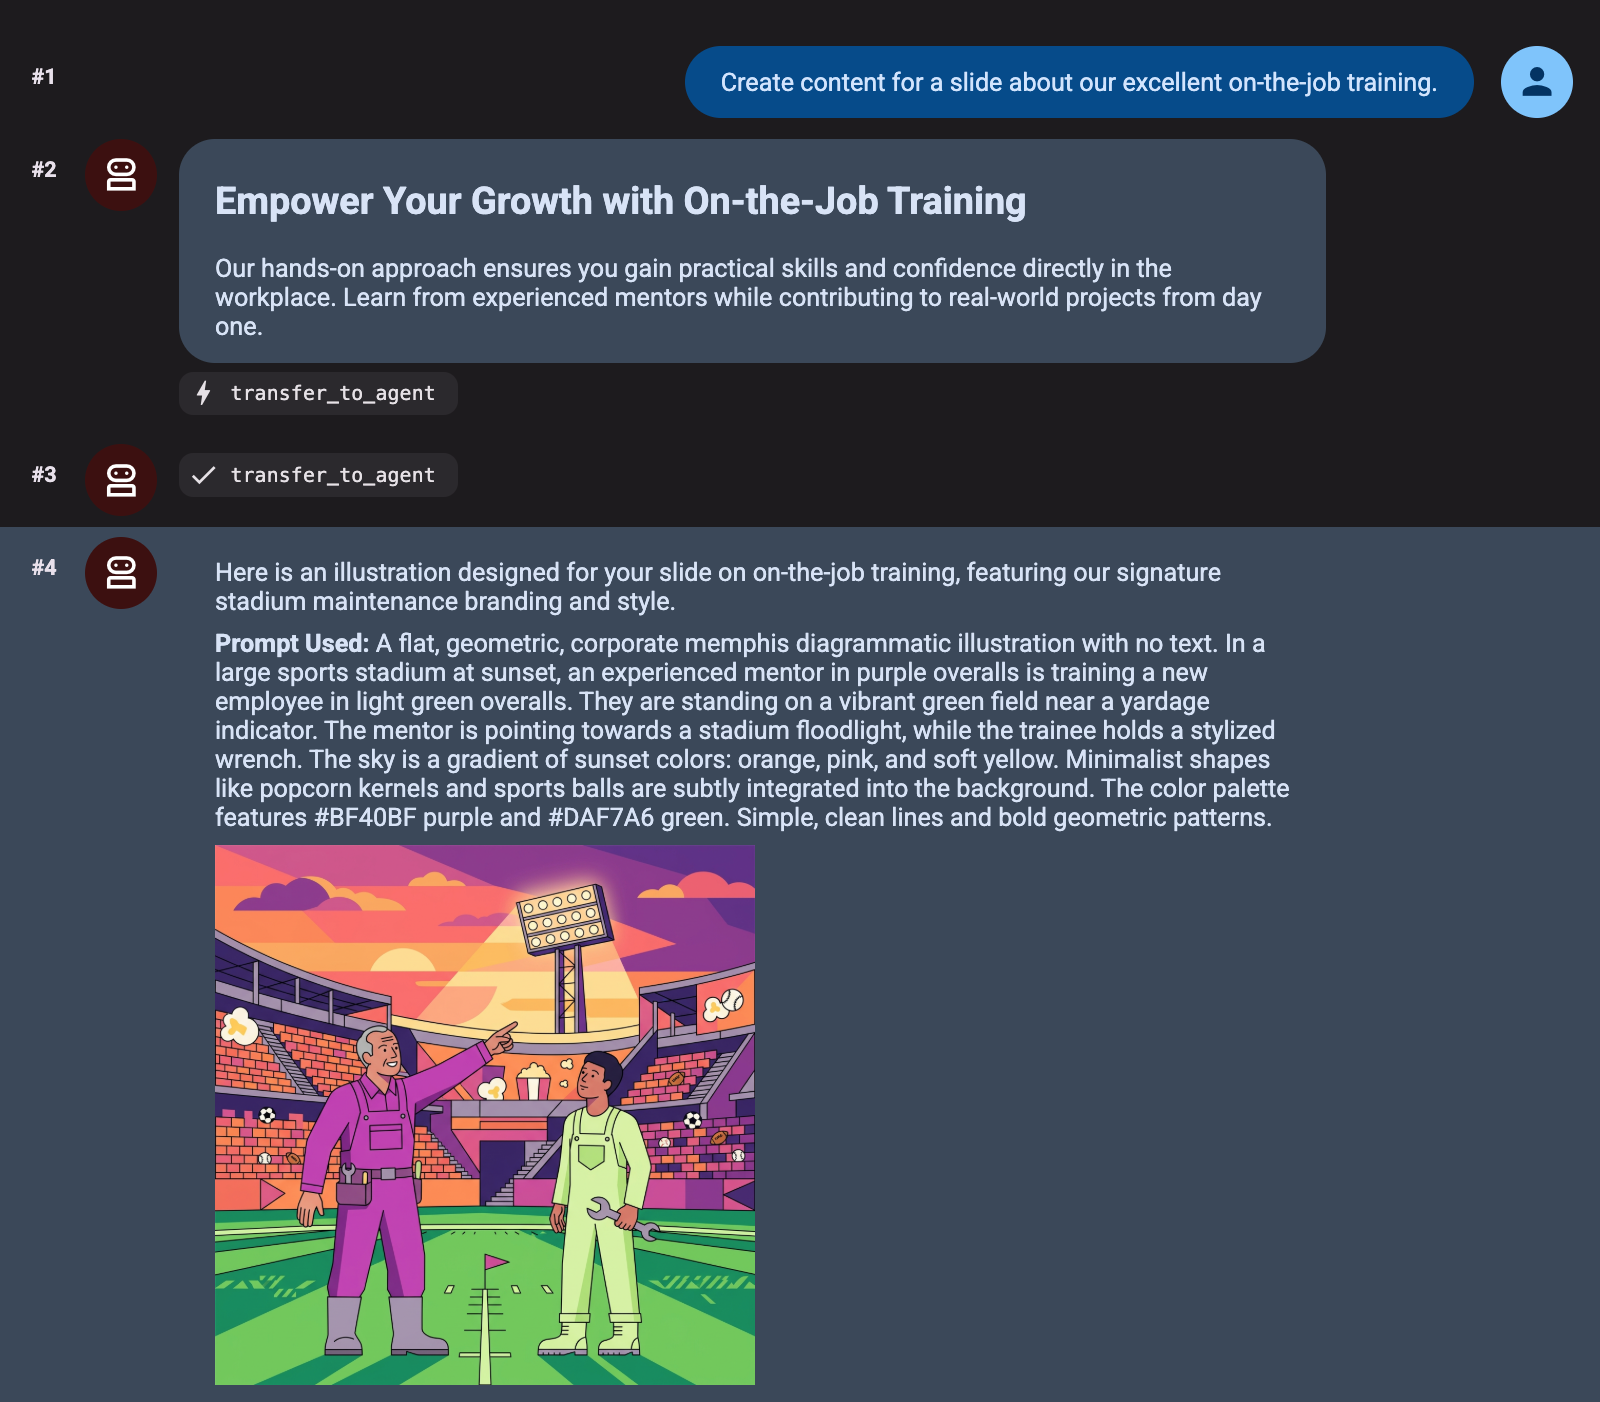
Congratulations!
In this lab, you demonstrated the power of cross-agent collaboration using the A2A Protocol! You deployed a local ADK agent onto Cloud Run as a discrete microservice and detailed its abilities via a standardized Agent Card. Then, you securely handed off tasks from a secondary independent agent. With these foundational skills, you are ready to start building scalable, multi-agent ecosystems across distributed teams.
Two evaluation areas of ADK Agents
:- Agent evaluation currently provides two kinds of evaluation: Evaluating the Final Response, which is assessing the quality, relevance, and correctness of the agent's final output. And Evaluating Trajectory and Tool Use, which means analyzing the steps an agent takes to reach a solution, including its choice of tools, strategies, and the efficiency of its approach. The trajectory is just a list of steps the agent took before it returned to the user. You can compare that against the list of steps you expect the agent to have taken.
Evaluating Final Response
:- Evaluating the final response compares a response to a reference response in your eval dataset. In a test file the reference is the expected final response from the model. You configure an expected
response_match_score to consider a test passed or failed. This metric compares the agent's final natural language response
to the expected final response, stored in the reference field. The ROUGE metric is used to calculate the similarity between the two responses. The response match score
defaults to 0.8, allowing for a small margin of error in the agent's natural language responses. Evaluating Trajectory and tool use
:- Before responding to a user, an agent typically performs a series of actions, which is known as a 'trajectory.' It might compare the user input with session history to disambiguate a term, or lookup a policy document, search a knowledge base or invoke an API to save a ticket. This is called a 'trajectory' of actions.
- Evaluating an agent's performance requires comparing its actual trajectory to an expected, or ideal one. This comparison can reveal errors and inefficiencies in the agent's process. The expected trajectory represents the ground truth - the list of steps you anticipate the agent should take. Evaluating trajectory and tool use compares expected values to actual values of:
determine_intent, use_tool, review_results, and report_generation. - You configure an expected
tool_trajectory_avg_score to consider a test passed or failed. This metric compares the agent's actual tool usage during the
evaluation against the expected tool usage defined in the expected_tool_use field. Each matching tool usage step receives a score of 1, while a mismatch
receives a score of 0. The final score is the average of these matches, representing the accuracy of the tool usage trajectory. Tool trajectory avg score defaults to 1.0,
requiring a 100% match in the tool usage trajectory. - Several ground-truth-based trajectory evaluations exist:
a) Exact match: Requires a perfect match to the ideal trajectory.
b) In-order match: Requires the correct actions in the correct order, and allows for extra actions.
c) Any-order match: Requires the correct actions in any order, and allows for extra actions.
d) Precision: Measures the relevance or correctness of predicted actions.
e) Recall: Measures how many essential actions are captured in the prediction.
f) Single-tool use: Checks for the inclusion of a specific action.
- Choosing the right evaluation metric depends on the specific requirements and goals of your agent. For instance, in high-stakes scenarios, an exact match might be crucial, while in more flexible situations, an in-order or any-order match might suffice.
Solutions provided by ADK
:- ADK evaluation currently provides two evaluation methods:
1)
Using a test file
: The test file approach involves creating individual test files, each representing a single, simple agent-model interaction (a session). It's most effective during active agent development, serving as a form of unit testing. These tests are designed for rapid execution and should focus on simple session complexity. Each test file contains a single session, which may consist of multiple turns. A turn represents a single interaction between the user and the agent.2)
Using an evalset file
: The evalset approach utilizes a dedicated dataset called an "evalset" for evaluating agent-model interactions. Similar to a test file, the evalset contains example interactions. However, an evalset can contain multiple, potentially lengthy sessions, making it ideal for simulating complex, multi-turn conversations. Due to its ability to represent complex sessions, the evalset is well-suited for integration tests. These tests are typically run less frequently than unit tests due to their more extensive nature.- Here is an example test file. A test file contains a session with queries, expected tool use, and reference responses. You can give the file any name, for example evaluation.test.json. The framework only checks for the .test.json suffix, and the preceding part of the filename is not constrained.
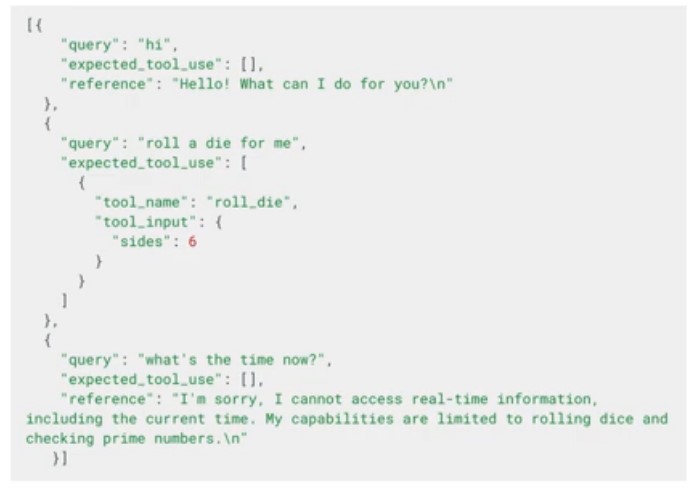
- In the eval tab of Web UI, you can create an evaluation set file, add a current session as an eval case to your file. Please note, you can load past saved sessions and then add them to the eval set. You can also run evaluations, for example with a new version of your agent.
How to run evaluations with the ADK:
- As a developer, you can evaluate your agents using the ADK in the following ways:
a) Through the Web-based UI: You can evaluate agents interactively through a web-based interface.
b) Programmatically: You can integrate evaluation into your testing pipeline using pytest and test files.
c) Through a Command Line Interface: Run evaluations on an existing evaluation set file directly from the command line.
This is an example of a pytest test case that runs a single test file.
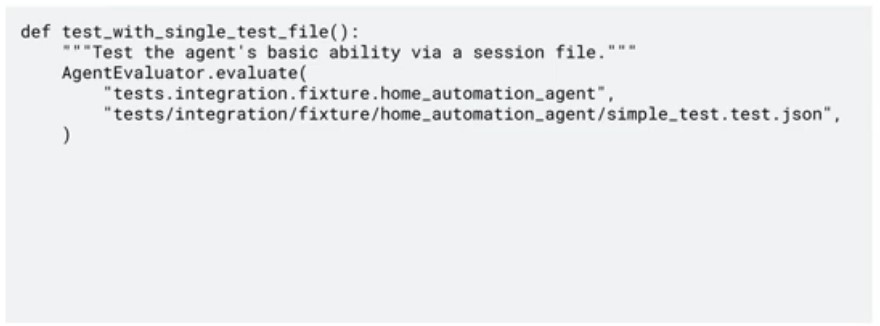
AgentEvaluator.evaluate method. - Finally, you can enable tracing by adding
AF_TRACE_TO_CLOUD=1 to your .env file. - Agent Development Kit (ADK) is a modular and extensible open-source framework for building AI agents. While ADK provides its own built-in evaluation module, this lab demonstrates how to use the Agent Platform Generative AI Evaluation Service to assess the performance of an ADK-based agent. This approach offers a broader, explainable, and quality-controlled toolkit to evaluate generative models or applications using custom metrics and human-aligned benchmarks.
- Objectives:
a) Build and run a local ADK agent.
b) Create and format an agent evaluation dataset.
c) Evaluate agent performance using:
- Single tool usage evaluation
- Trajectory-based evaluation
- Response quality evaluation
Overview
Agent Development Kit (ADK) is a modular and extensible open-source framework for building AI agents. While ADK provides its own built-in evaluation module, this lab demonstrates how to use the Agent Platform Generative AI Evaluation Service to assess the performance of an ADK-based agent. This approach offers a broader, explainable, and quality-controlled toolkit to evaluate generative models or applications using custom metrics and human-aligned benchmarks.
In this lab, you will walk through a step-by-step guide to evaluate your ADK agent using Agent Platform Gen AI Evaluation.
This lab is based on this notebook from the GoogleCloudPlatform/generative-ai repo.
Objective
By the end of this lab, you will be able to:
- Build and run a local ADK agent.
- Create and format an agent evaluation dataset.
- Evaluate agent performance using:
- Single tool usage evaluation
- Trajectory-based evaluation
- Response quality evaluation
- Use Agent Platform’s Evaluation Service to generate explainable metrics and benchmark results.
Task 1. Prepare the environment in Agent Platform Workbench
-
In the Google Cloud console, search for the Agent Platform at the top of the console and select the first result.
-
Click on Enable APIs.
-
In the left-hand Agent Platform navigation pane, under Notebooks click on Workbench.
-
Under Instances, click on Open JupyterLab next to your
vertex-ai-jupyterlabinstance. JupyterLab will launch in a new tab. -
On the JupyterLab Launcher page, click Terminal to open a Shell.
-
Download a notebook and helper file for this lab with the command:
gcloud storage cp gs://qwiklabs-gcp-02-df4bce6d7e6d-bucket/* . -
Open the
evaluating_adk_agents.ipynbfile. -
In the Select Kernel dialog, choose Python 3 from the list of available kernels.
-
Run the first code cell under the header Install Agent Development Kit (ADK) and other required packages to install dependencies. To run a cell, click the play button at the top or highlight the cell and press SHIFT+ENTER on your keyboard.
-
To use the newly installed packages in this Jupyter runtime, you must restart the runtime. Wait for the [*] beside the cell to change to [1] to show that the cell has completed, then in the Jupyter Lab menus, select Kernel > Restart Kernel and Clear Outputs of All Cells....
-
When prompted to confirm, select Restart.
-
Once the kernel has restarted, run the next cell under Set Google Cloud project information to set Google Cloud project information and initialize Agent Platform.
-
Run the next cell in the Import libraries section of the notebook.
Task 2. Read and run the rest of the notebook
Read and run through the cells of the notebook. In its sections, you will:
-
Set tools to define
get_product_details()andget_product_price()functions that your agent will later use as tools. - Set the Model to define the Gemini model your agent will use.
- Assemble the agent by defining a function that builds an Agent, providing it the tools you've defined above, and uses it to generate a response to a query.
- Test the Agent to see a couple of example responses, including Markdown-formatted output citing which functions were called.
- Learn about Evaluating an ADK agent with Agent Platform Gen AI Evaluation.
- Prepare an Agent Evaluation Dataset consisting of a set of prompts and their expected tool calls (reference trajectory).
- Run Single tool usage evaluation to determine if the agent is choosing the correct single tool for a given task.
- Run Trajectory Evaluation to assess whether the agent not only chooses the right tools but also utilizes them in your intended order.
- Learn to Visualize Evaluation Results.
- Learn to Define a custom metric and evaluate on it.
- A bonus Bring-Your-Own-Dataset (BYOD) section shows you how to evaluate agent responses generated elsewhere by providing an evaluation dataset containing those responses.
Congratulations!
You have successfully evaluated an ADK agent using Agent Platform Generative AI Evaluation. You built and executed the agent locally, prepared a custom evaluation dataset, and assessed the agent’s tool usage, action trajectory, and final response quality using built-in evaluation tools.
You evaluated the agent using the following components:
- ADK (Agent Development Kit) for building and running the agent
- A structured evaluation dataset with expected tool usage and references
- Agent Platform Gen AI Evaluation Service
- Tool usage evaluation metrics
- Trajectory matching for step-by-step accuracy
- Evaluation on a custom metric